React is just a library. It is not a complete framework.
It has a huge library which takes time to understand.
It may be difficult for the new programmers to understand code.
React uses JSX where in both HTML and JavaScript are written together so it becomes a bit confusing to understand the coding for the beginner and JSX is not understood by the browsers so we need to convert this into JavaScript object using JSX transformer Babel.
We also need to learn about Web-pack used to build the application and NPM to run the React application. So, we need to learn so many things to resolve the errors if occur.
React does not have things inbuilt like Angular, we need to include other external files to perform routing but not in Angular.
Q.UI(User Interface) and Single Page Application(SPA).

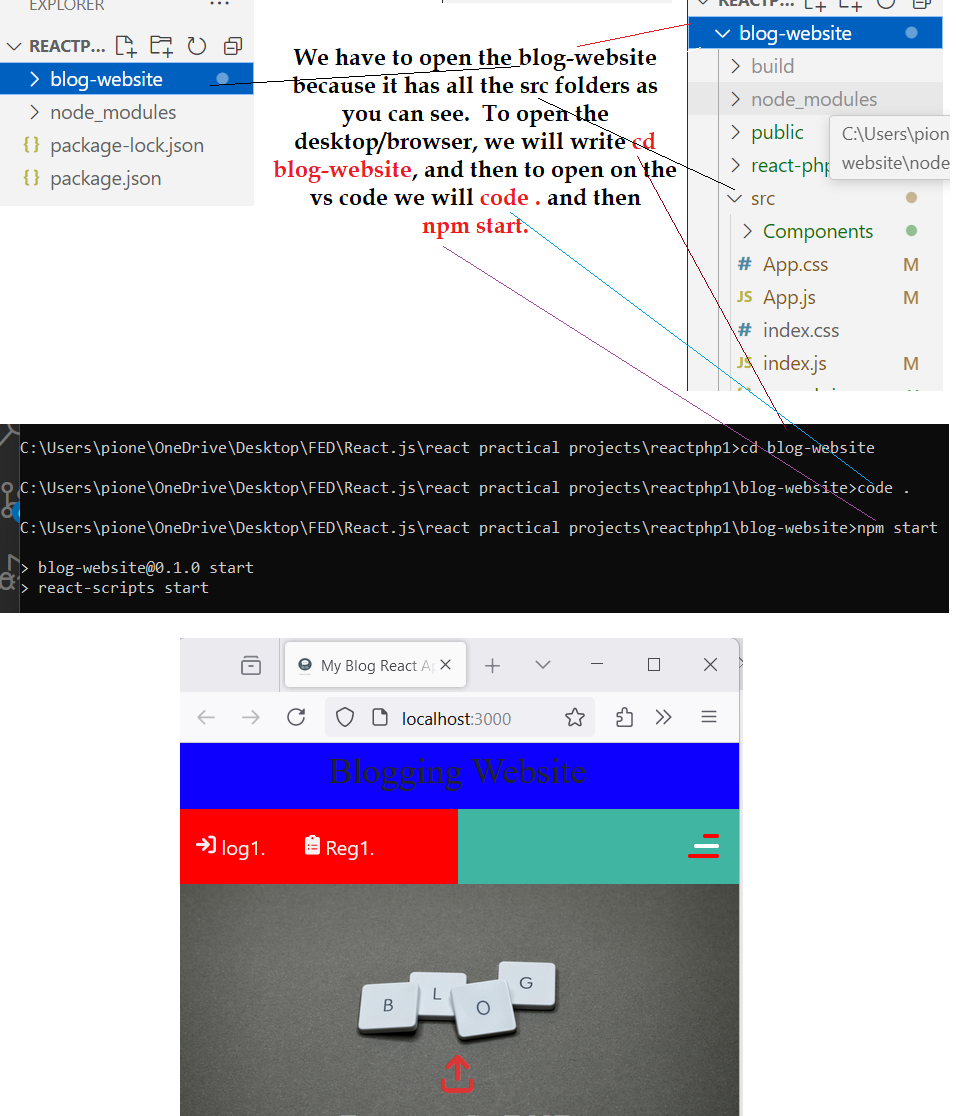
How to open the react app on the browser.
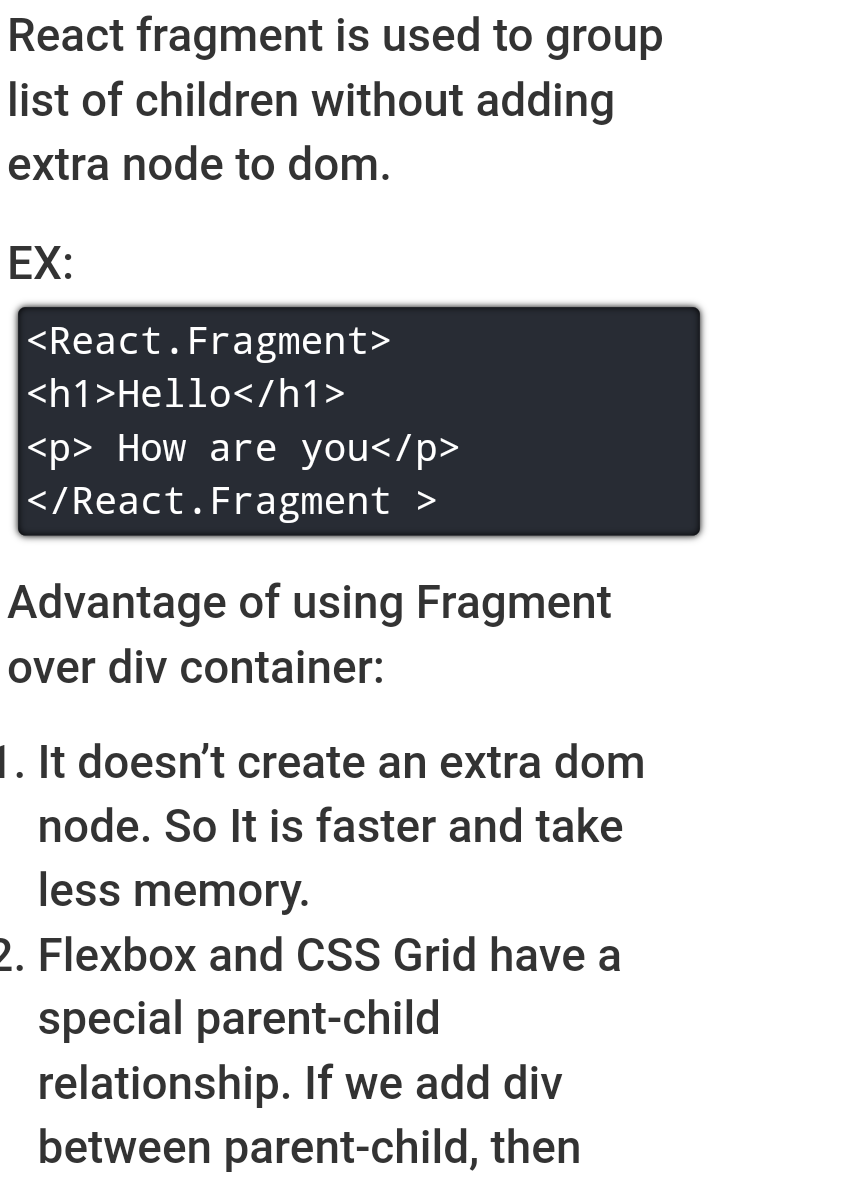
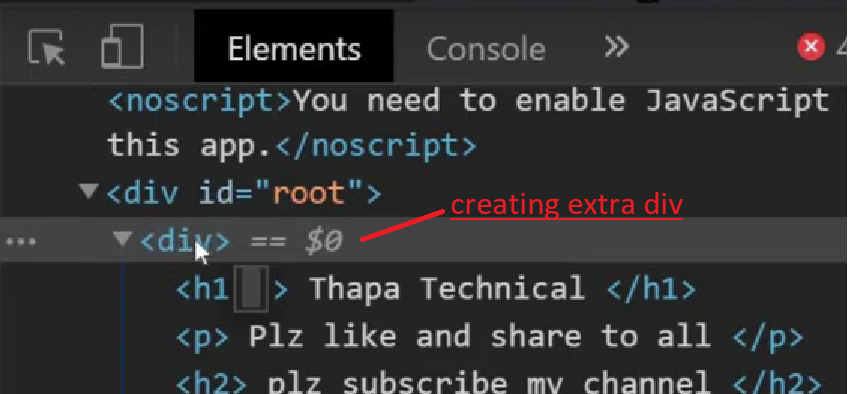
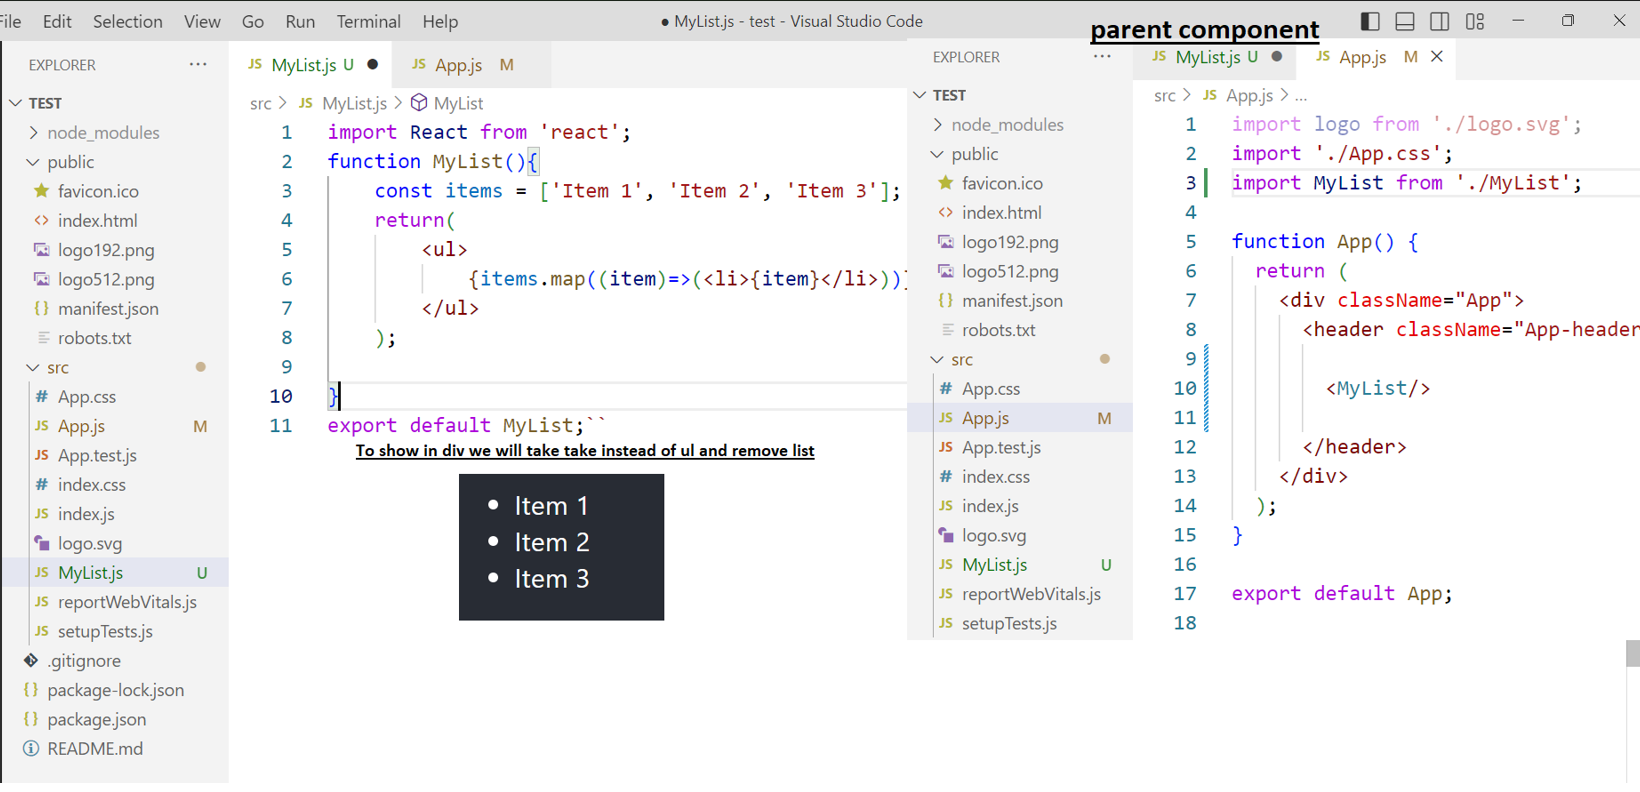
Here, you can see that it is creating extra div called node(parent div) that can create issue while
using
grid and flex in css3. To avoid this extra node, we use fragment.
In simple words, useState allows our functional components which used to be stateless become stateful.
And useEffect allows our functional components to use lifecycle hooks which were, in the past, only
supported for class components.
useState allows functional components to have state, like this.state in class components.
useEffect allows functional components to have lifecycle methods (such as componentDidMount,
componentDidUpdate and componentWillUnmount) in one single API.
MVC is a design pattern that separate an application into three logical components and those components
are
Model, View and Controller.
1.React uses a view of MVC but Angular is made complete of MVC
2.React uses virtual DOM but Angular uses actual DOM
3.React has one-way Data binding but Angular has two-way data binding.
4.React uses JSX but Angular uses Type Script which is the super set of JavaScript.
5.React has server side rendering but Angular has client side rendering.

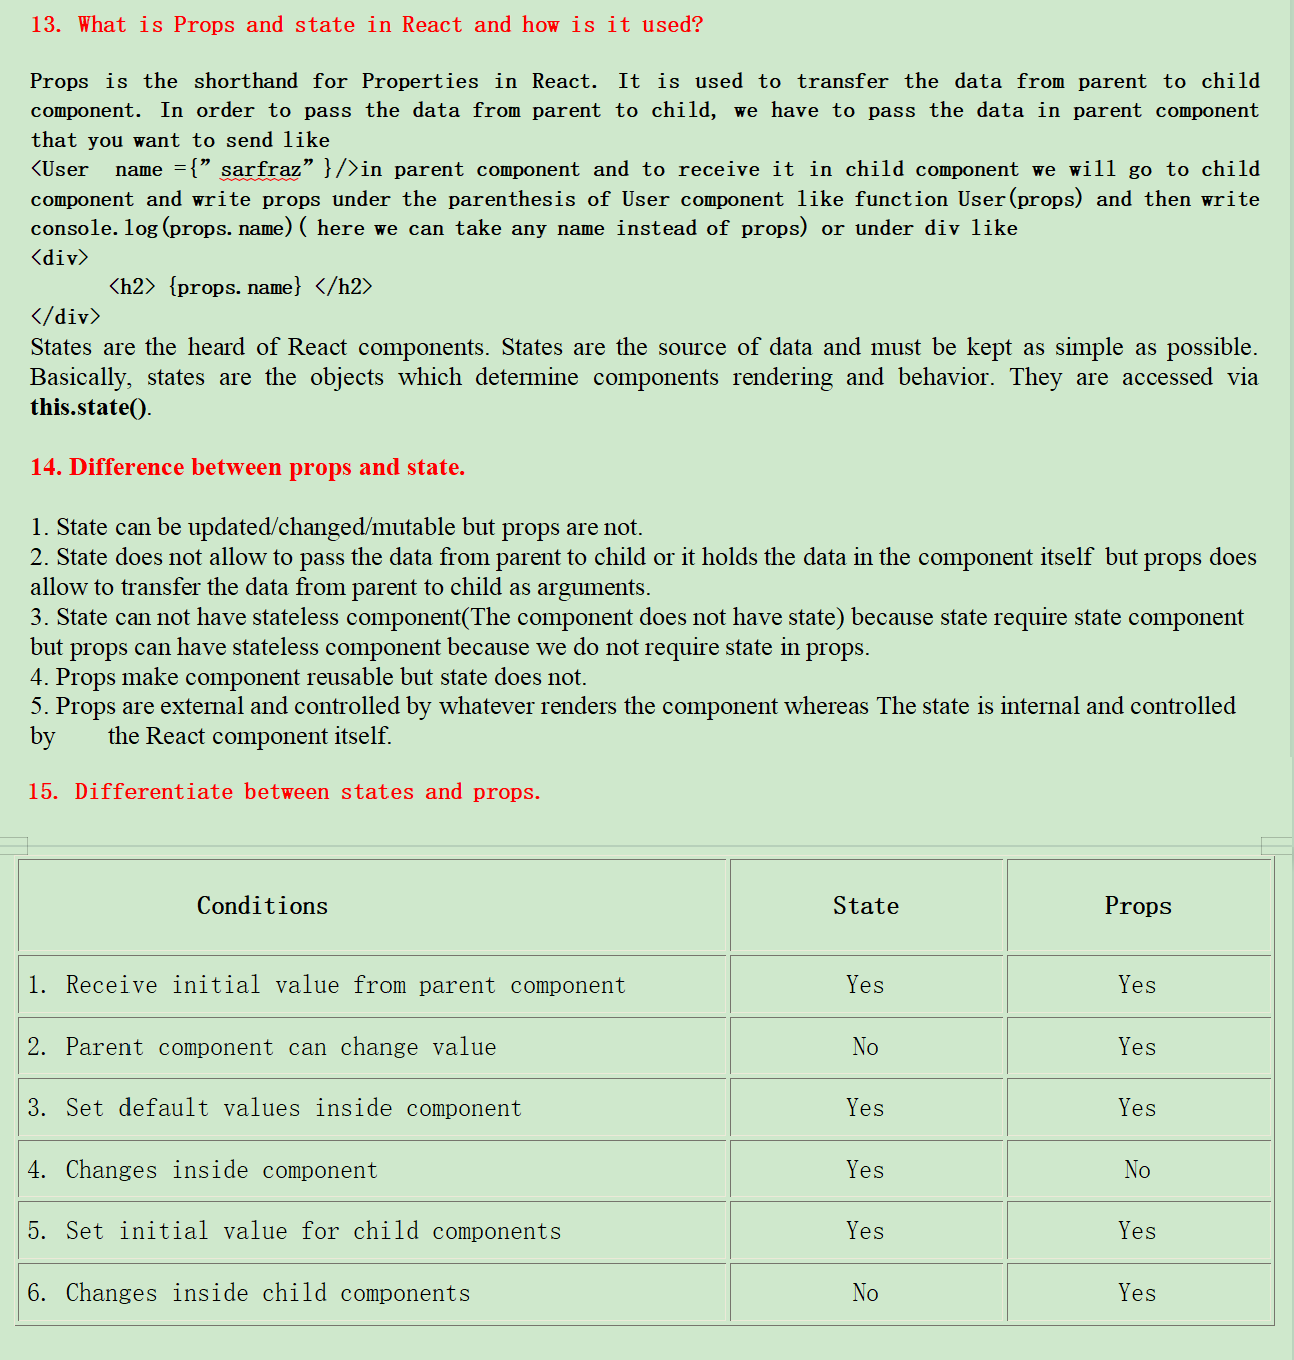
In order to pass the data from parent to child, we have to pass the data in parent component that you want to send like
{props.name}
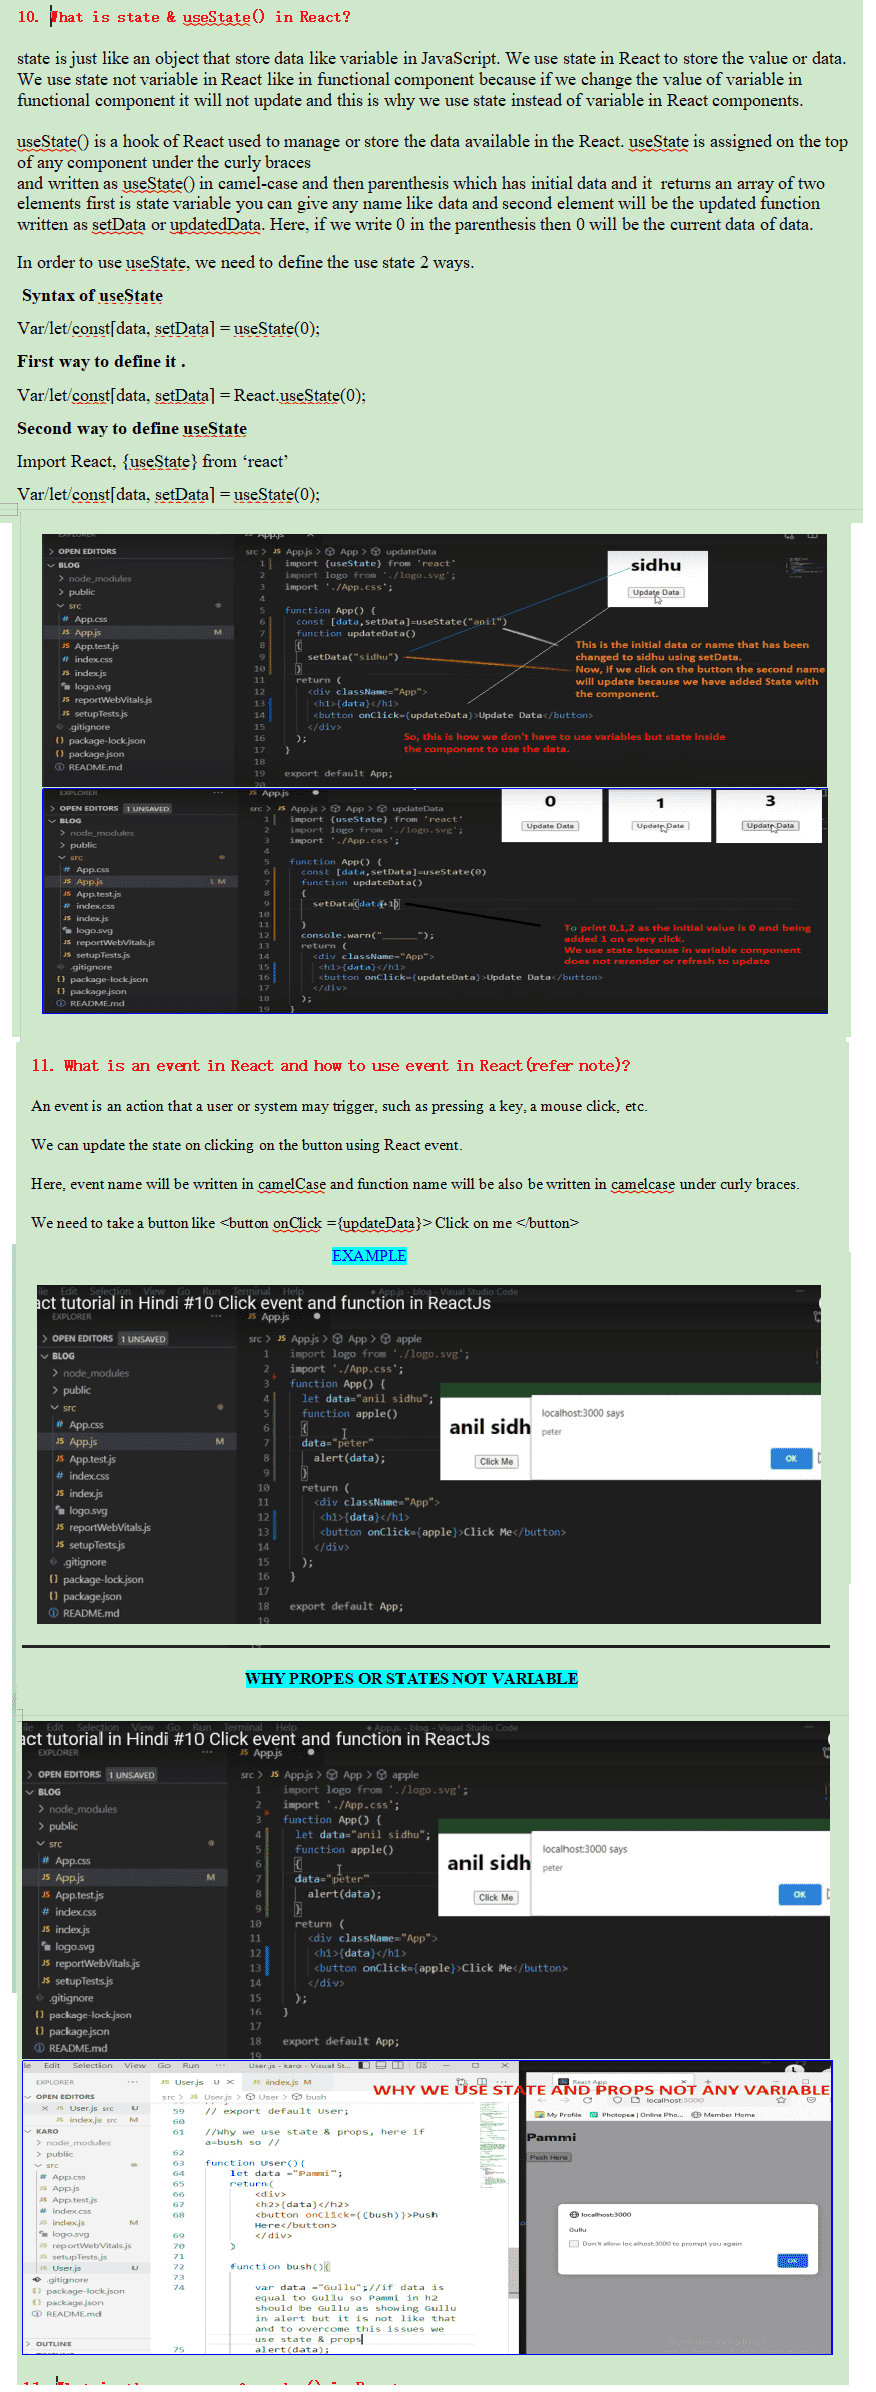
States are the heard of React components. States are the source of data and must be kept as simple as possible. Basically, states are the objects which determine components rendering and behavior. They are accessed via this.state().
1.State can be updated/changed/mutable but props are not.
2.State does not allow to pass the data from parent to child or it holds the data in the component
itself
but props does allow to transfer the data from parent to child as arguments.
3.State can not have stateless component(The component does not have state) because state require state
component but props can have stateless component because we do not require state in props.
4.Props make component reusable but state does not.
5.Props are external and controlled by whatever renders the component whereas The state is internal and
controlled by the React component itself.
We can update the State of a component using this.setState() method.
HOOKS
Hooks are a new addition in React 16.8. They let you use state and other React features without
writing
a
class.
We know that when we use class components we have various inbuilt features such as state,
life-cycle-methods, pure component, ref etc. But, these features are not available in functional
components
by default and to use them we use Hooks such as useState to use state in functional component,
useEffect
to
use life-cycle-methods in functional component, use memo for pure component and useRef for ref etc.
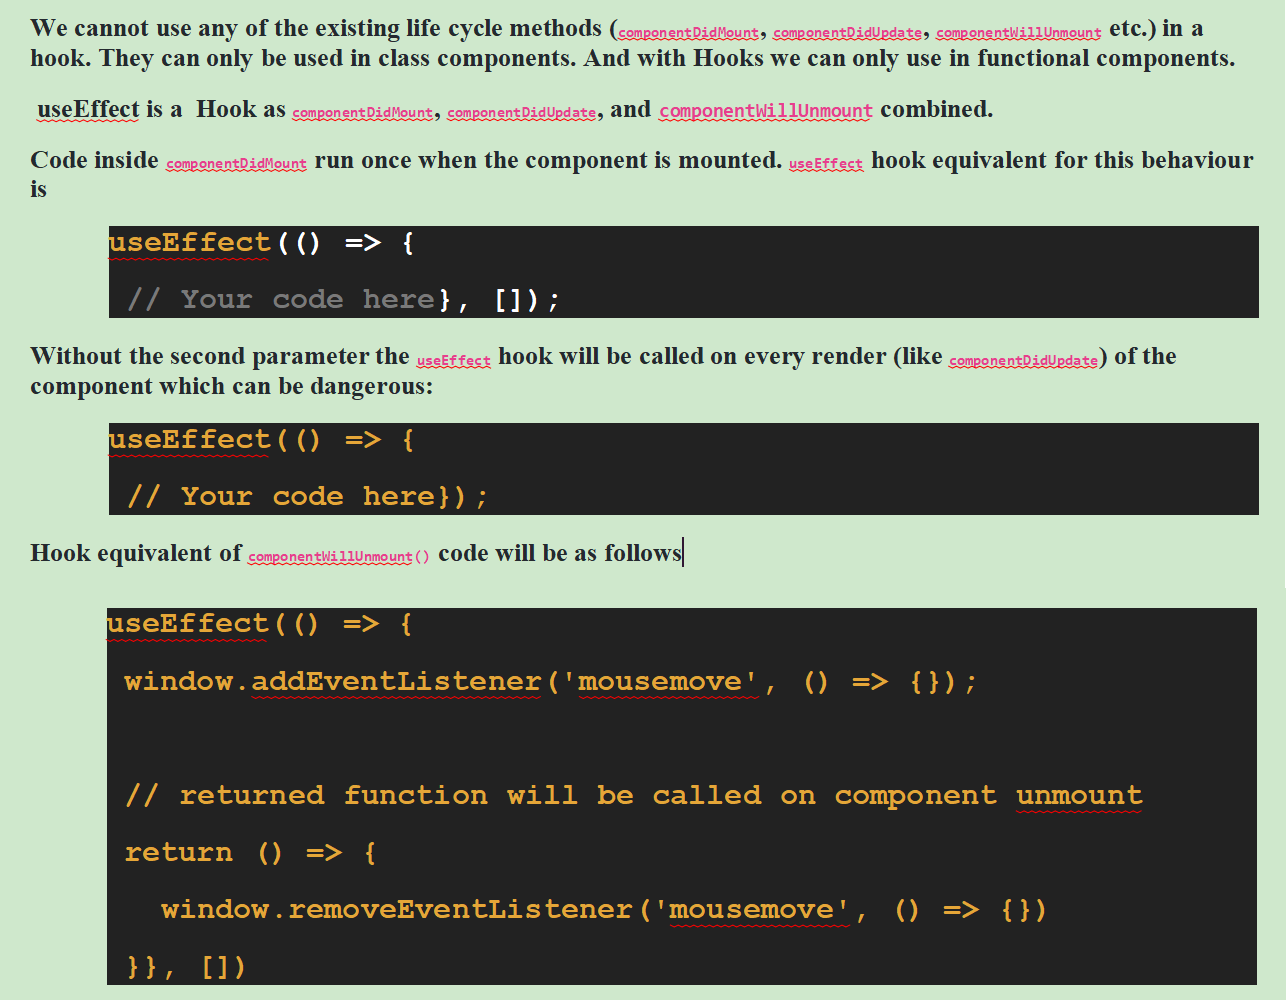
useEffect
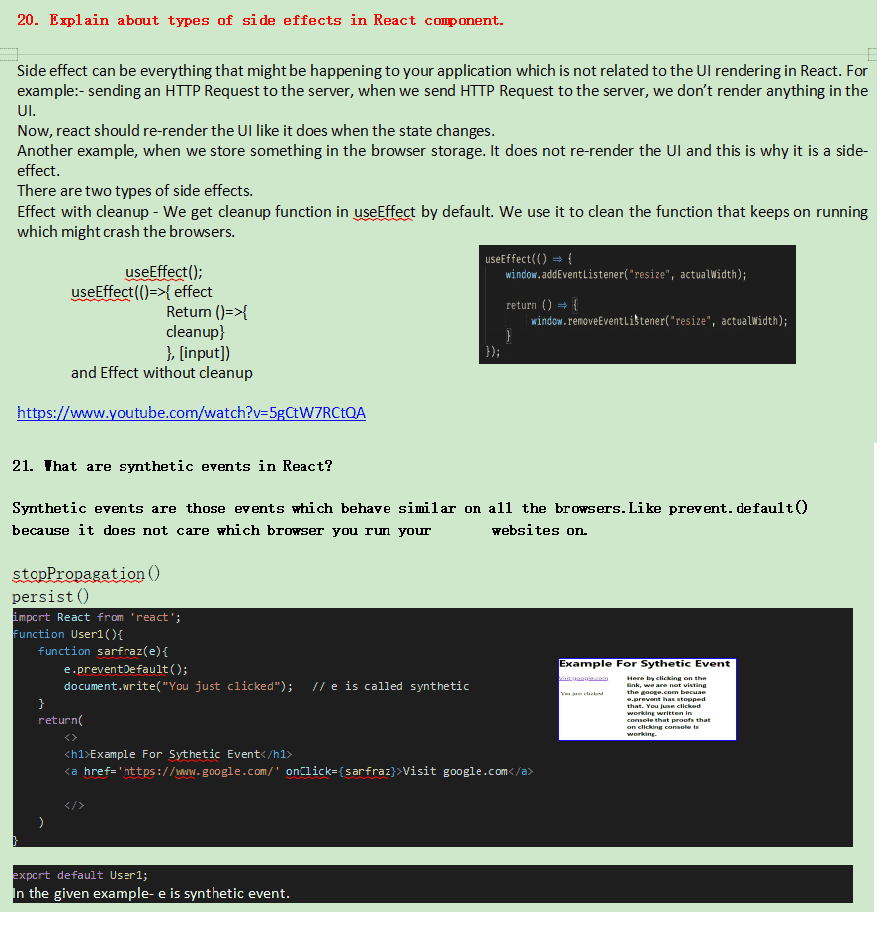
useEffect is a hook used in a function component to avail the features of life cyle methods. In
another word, all life cycle methods are under one hook called useEffect.
useEffect runs after every render which means any changes we made in the component will re-run
the useEffect.
We use useEffect when we have to perform any task or run any function after a while, we can use it.
useEffect is used inside a component it allows us to count the state varialbe or any props. So, we
don't require any special API to read it. It is already in a functional scope.
Since useEffect is used for all life cycle methods, So, it will render when we refresh, create any
element,
update
the state, pass the props or delete any element. We can use array dependencies as second
paremeter to stop the redering when we refresh.
useEffect return an array of two elements first is an updatad function and second is array
dependencies.
We pass any state and props in array dependencies that we want to update on button click or with any
event handler if we have more than one states or props that gets updatad unnacessarily.
useEffect will cover all the three phases of
life-cycle-methods that is mounting, updating and unmounting.
In order to use useEffect, we need to import it.
import React, {useEffect} from 'react'
We do not require to import if we write React.useEffect();
Once it is imported, we will write useEffect(); just below the functional component before
return statement.

Functional component cannot hold or manage state
Class component is tough to understand but Functional component is simple and easy to understand
Class component can work with all life cycle methods but Functional component does not work with any life cycle method
Class component can be reused Functional component cannot be reused

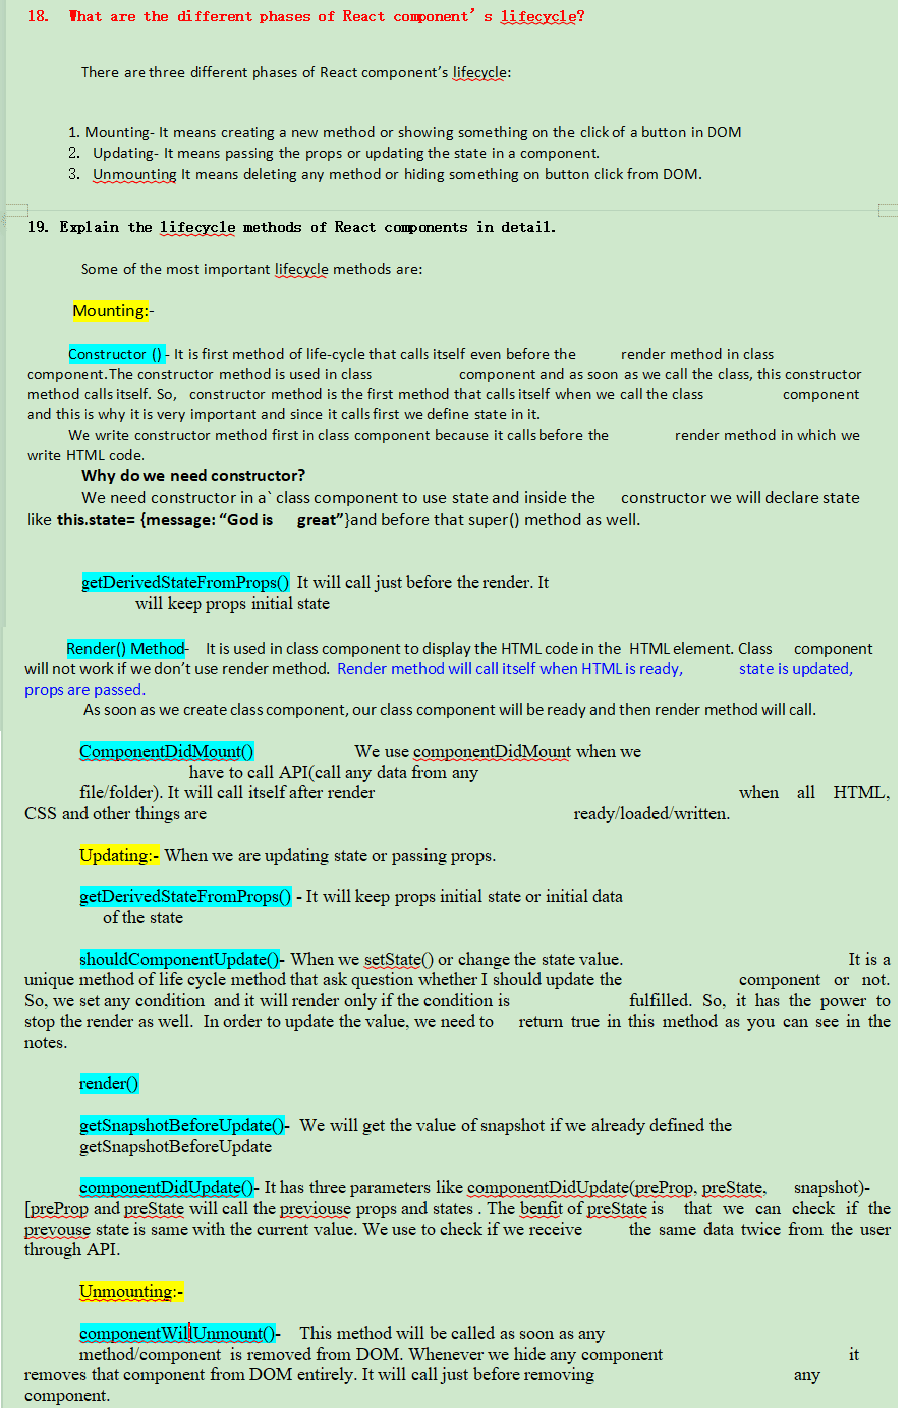
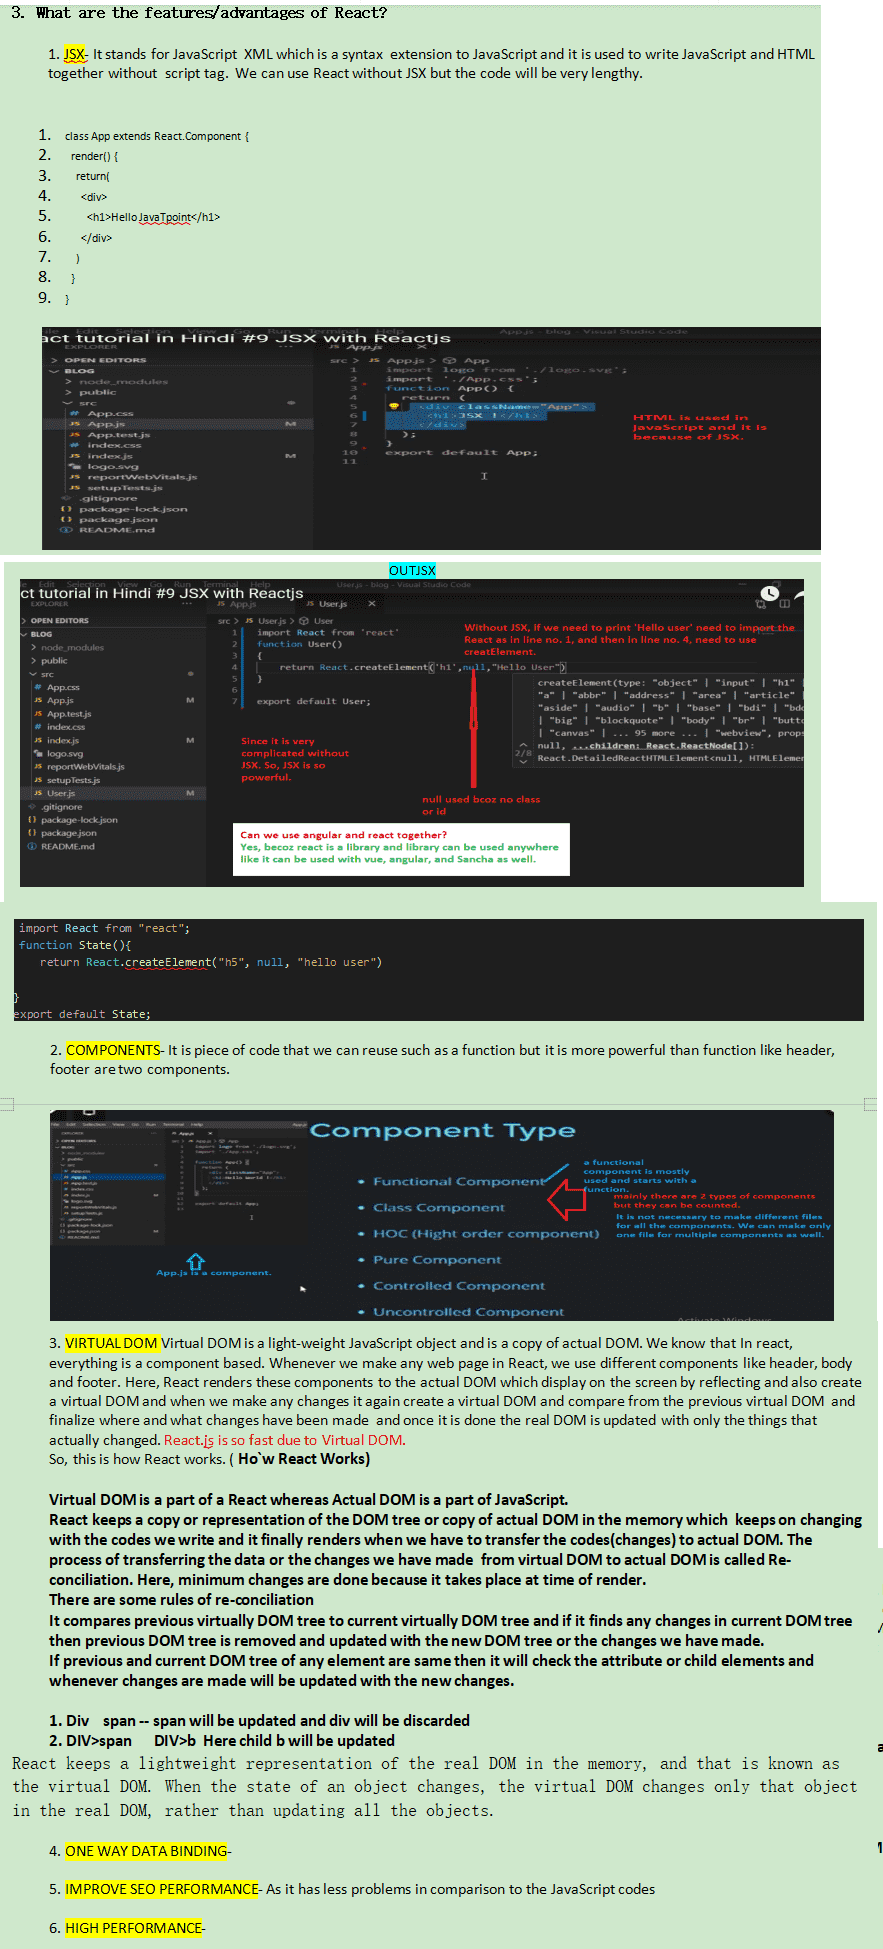
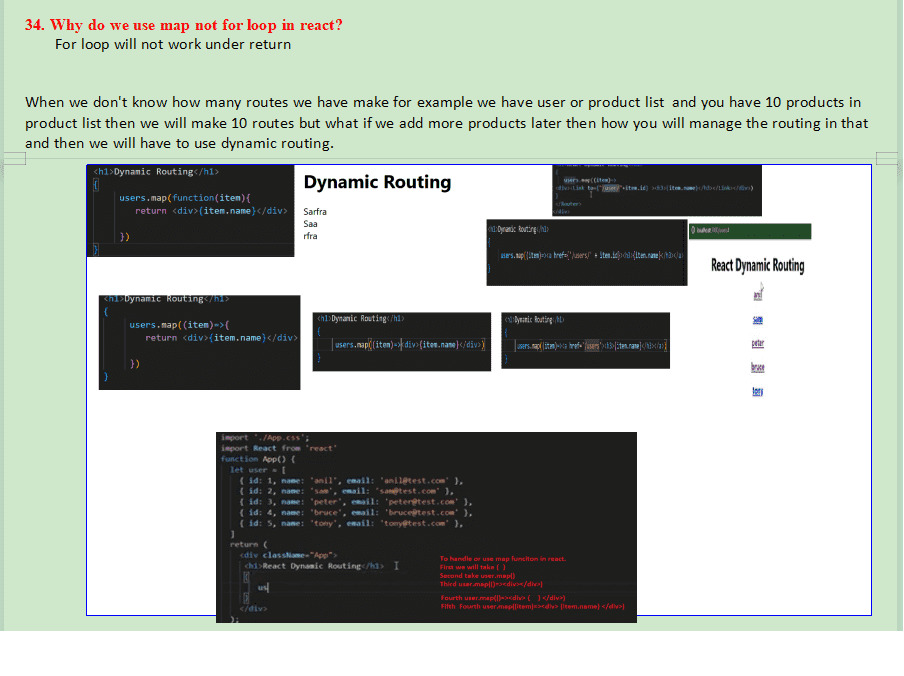
Way to apply bootstrap in react
- Click on the link
- Add style link under public > index.html > after title
- Add script link under public > index.html > befor the closing tag of body
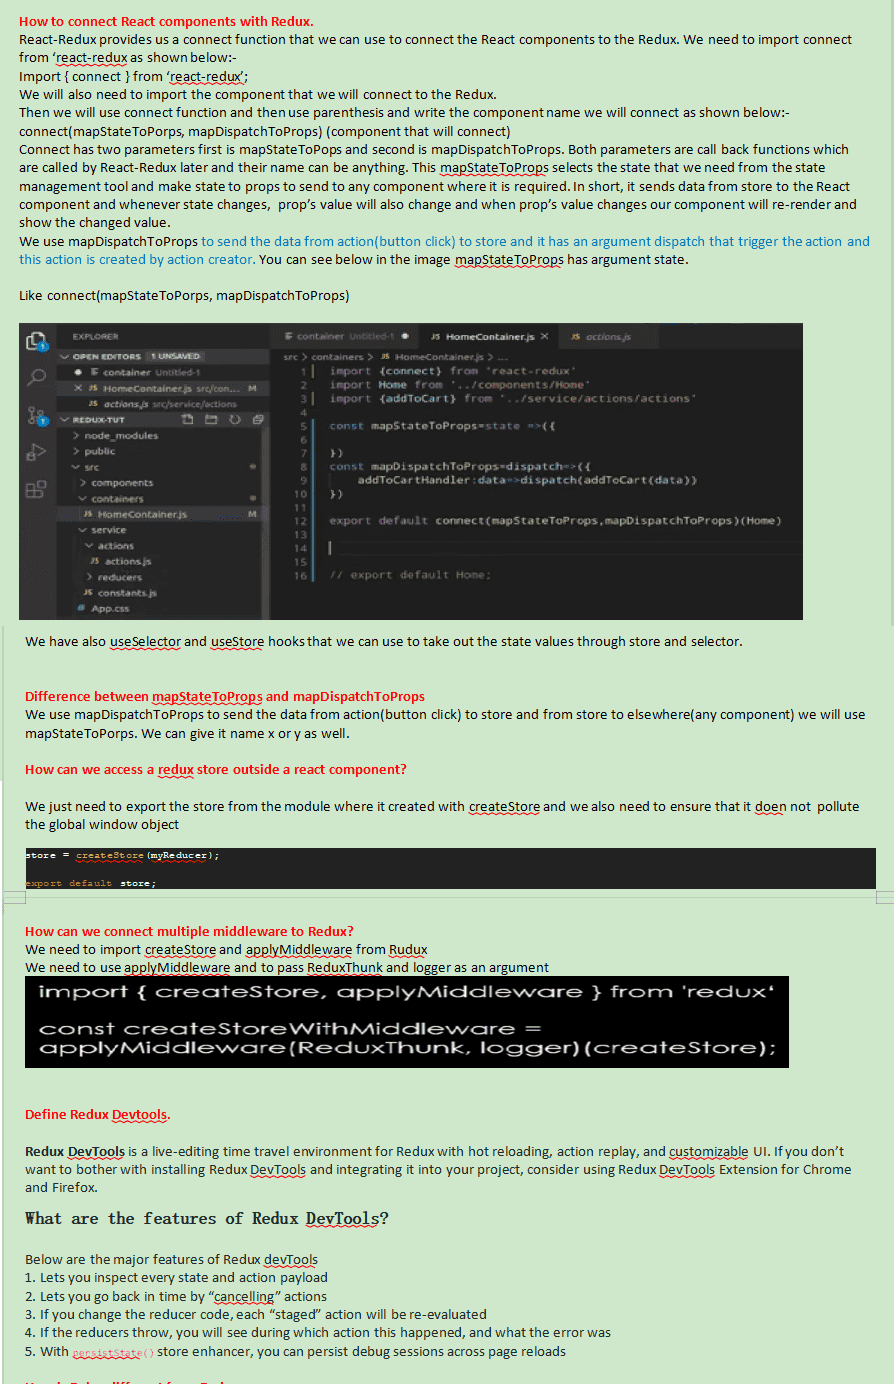
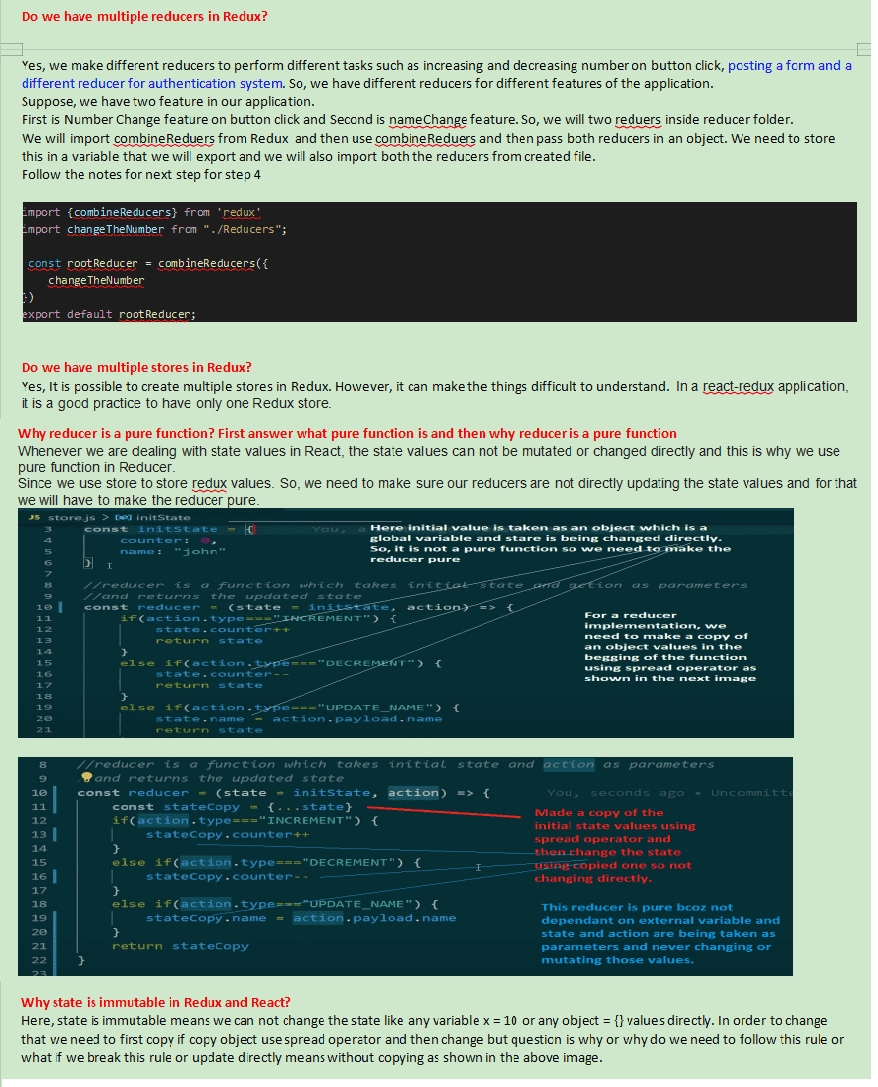
Devtools are used to track redux action, reducer, state and test cases. In order to implement it
we need to download the extension of redux devtools in chorme searching it inside the
google.com and once it is installed check it if installed properly. When we right click we will see
redux devtools. Go to devtools and open it by to left/bottom/right.
Now, go to the store component or where we have created the store and add a piece of code as a second
argument becuase first argument will be our root reducer.
Now, we will see the output of the code and when we update the state with button click or any
event handler, we will be able to see the updated state, action in the dev tools. We will also be able
to see the test cases created by redux under test tab . It is an alternate of console. We will not
require console now.
Real DOM Vs Virtual DOM
1. It updates slow. 1. It updates faster.
2. Can directly update HTML. 2. Can’t directly update HTML.
3. Creates a new DOM if element updates. 3. Updates the JSX if element updates.
4. DOM manipulation is very expensive. 4. Virtual DOM manipulation is not expensive.
5. Too much of memory wastage. 05. No memory wastage.






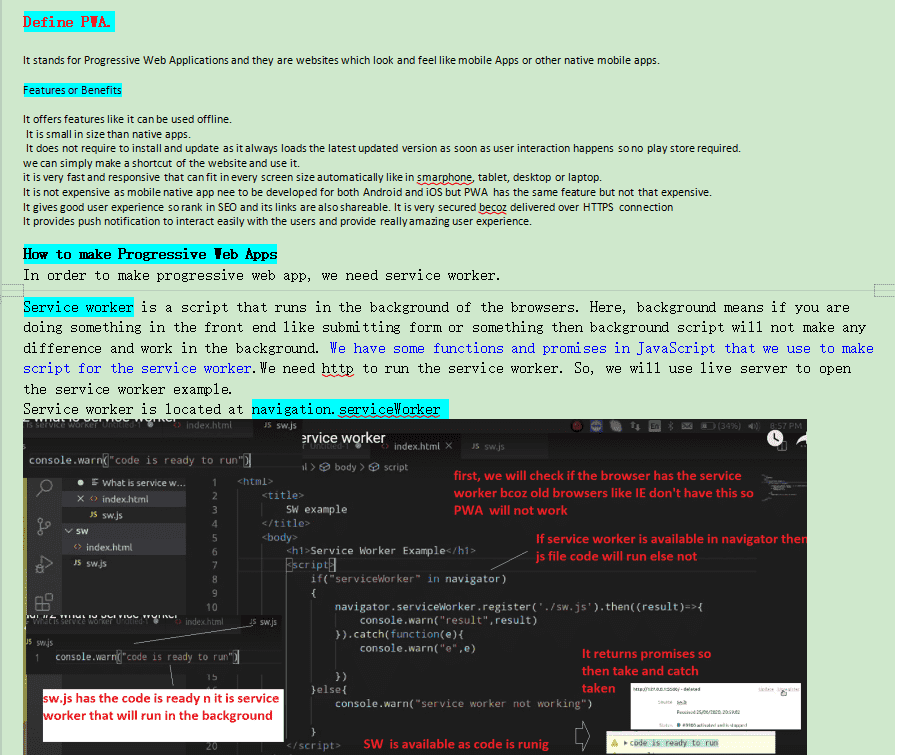
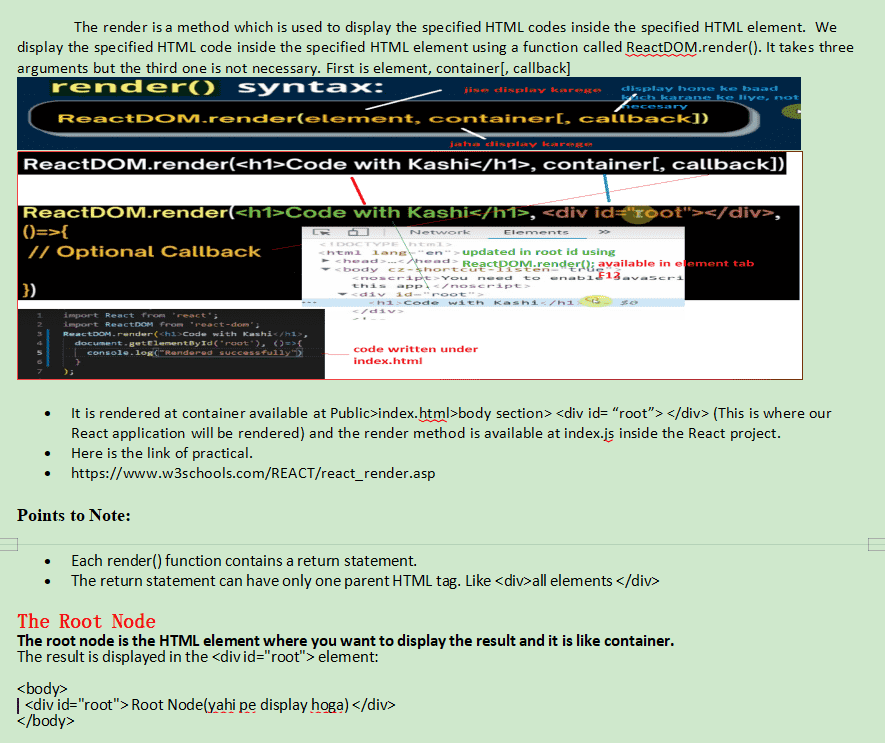
Progressive rendering is a techniques used to improve the performance of a web-page so that web page can display as quickly as possible. Progressive rendering is a concept that every web developer should know because it helps a lot in the fast loading of a website. Most of the developers are using progressive rendering but they are unaware that the thing that they are doing to load the website quickly is actually progressive rendering. What is Progressive Rendering?
Before Understanding Progressive rendering, We should understand what is rendering of the web page and what progressive is. Rendering means converting code into an interactive web page that our users can see and utilize its functionality. Now, being Progressive means doing things such that the highest priority thing will be done first, after that less priority thing will be done and in this manner, work will be completed. So, Progressive Rendering means rendering the web page in such a manner that high priority component will be rendered first and then low priority component will be rendered. Before going deep into it, we should understand how we can give priority to different components of our web page. So the priory of our component should depend upon the viewport. This means those components that come in the viewport after loading the website for the first time should get high priority and those components that are below that viewport should get low priority.
How Progressive Rendering is different from Server Side Rendering(SSR) and Client Side Rendering(CSR)? So before knowing that difference, one should first know what client-side rendering and server-side rendering are: Client-Side Rendering: It means rendering pages directly in the browser using JavaScript. All logic, data fetching, templating and routing are handled on the client or browser on which you are working on rather than the server. How it works behind the scenes.
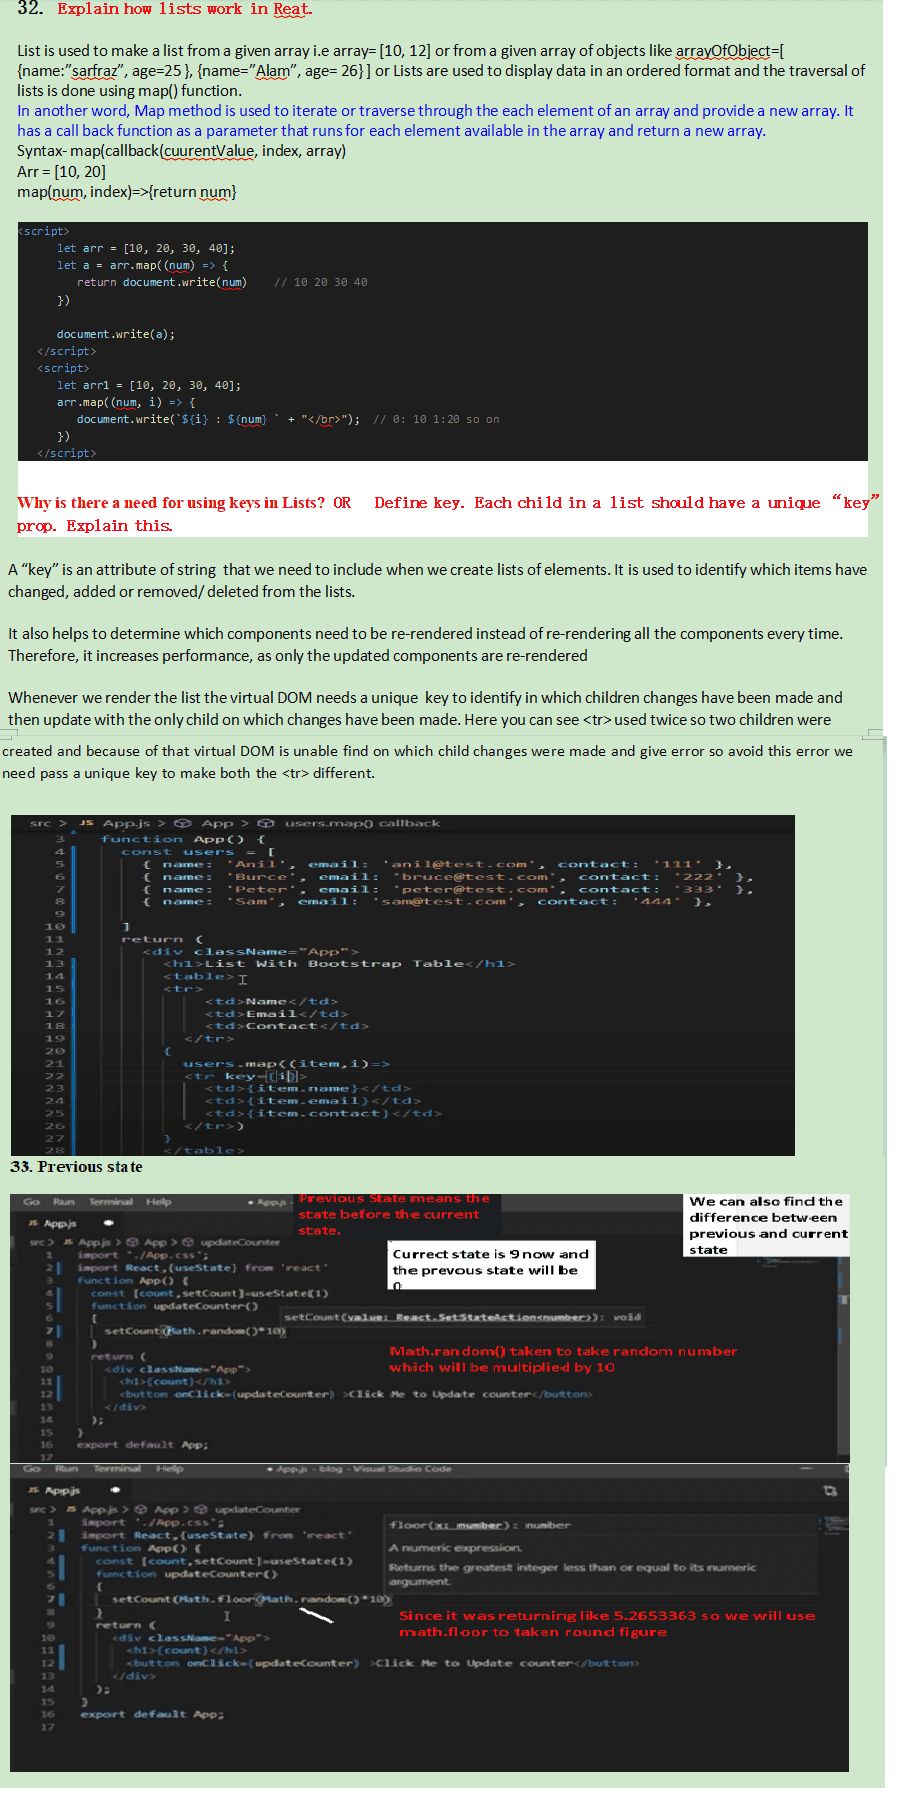
Stateful components are those component in which we use or define state whether it is a class or functional component. Do not use state in stateless component.
Stateful component can be reused.
Stateful is also known as class component. Stateless can not be reused because no state Stateless is also know as functional component.
Stateful component can work with all life-cycle methods. Can not work with all life cycle methods.
Stateful component is a bit confusing. Not that confusing.

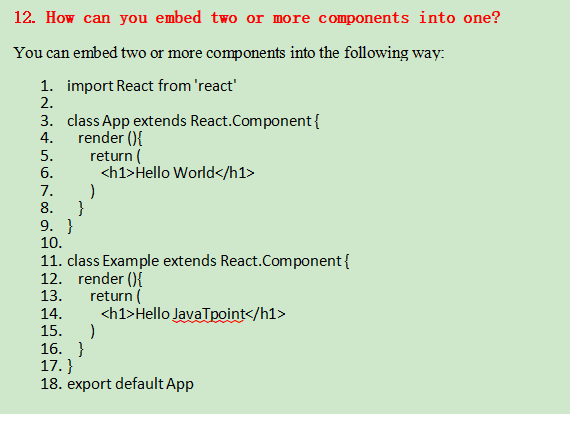

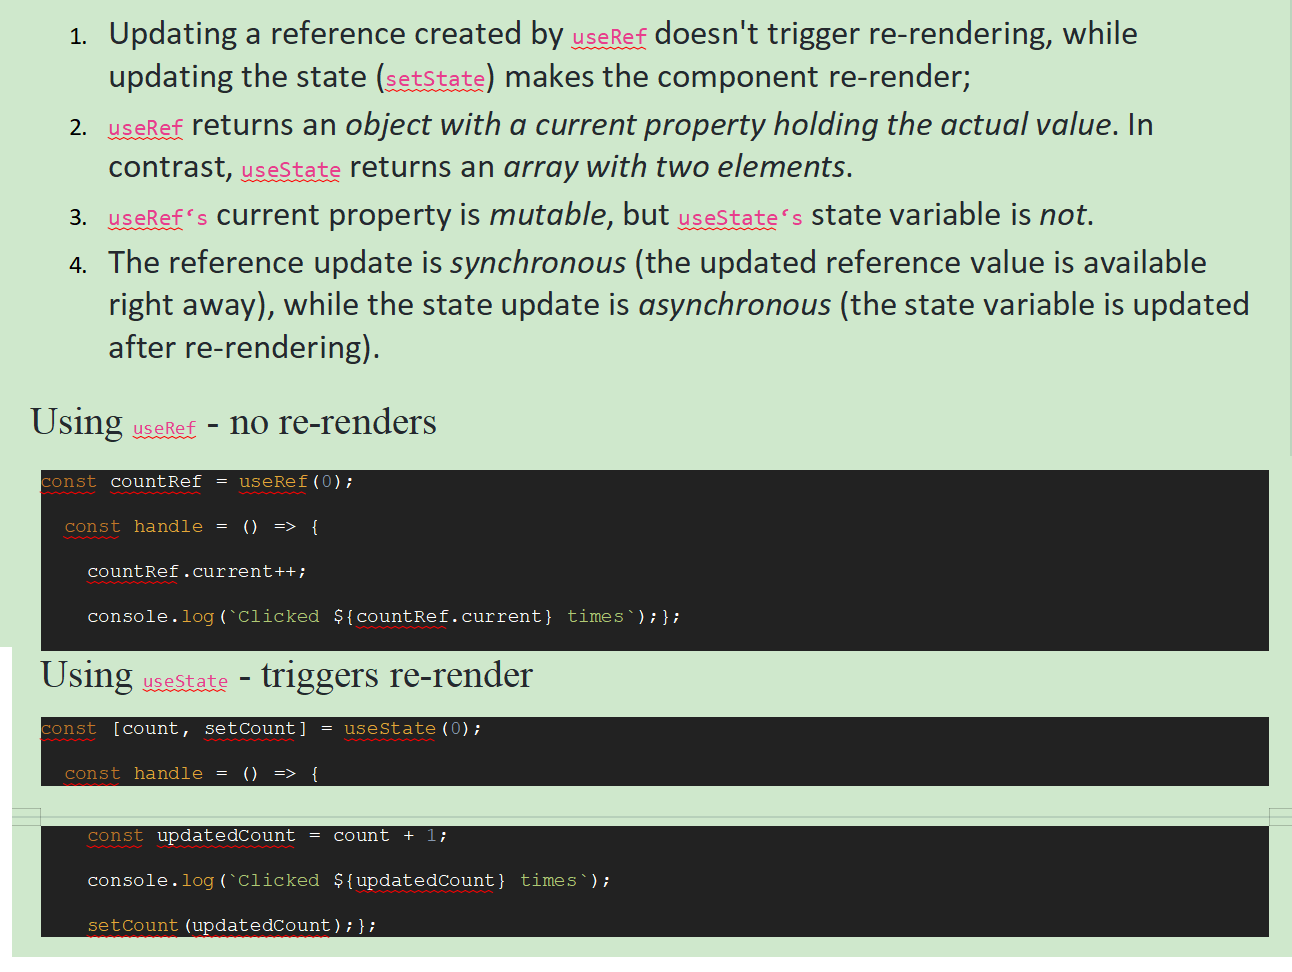
useReducer can do everything what we can do with useState but useState can't do what useReducer. such as sending data from parent to grand child.
useState is small project and useReducer is for big project and it is a part of Redux.
if we have a single state either of a boolean , number , or string we should use the useState hook. And if our state is an object or an array, we should use the useReducer hook.
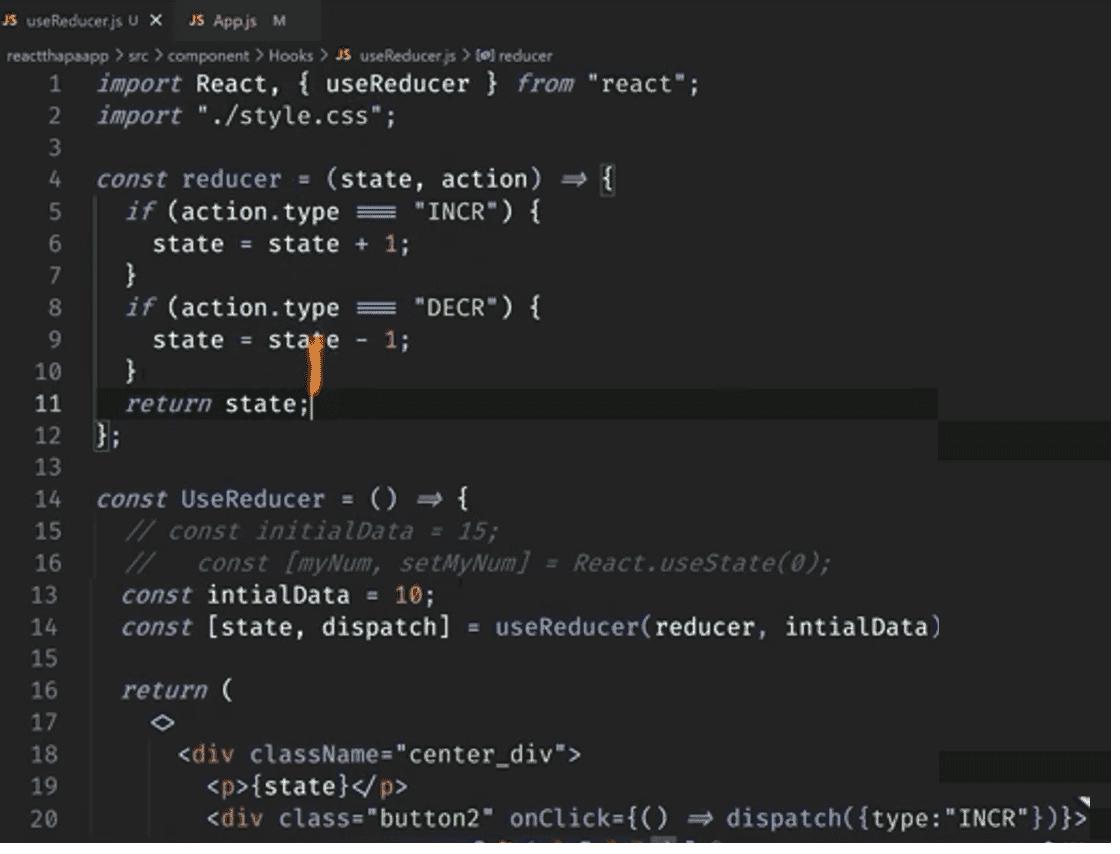
useReducer()
useReducer is a hook and it is a part of Redux. It returns an array of two elements. First is
state(always written as state) and second element is dispatch method. It is better to write
dispatch as it is convention.However, we can take any name if we want. dispatch is used to
trigger function, we have updatad function inside the reducer function by which we change the
value of the state or update the state.
useReducer taks two arguments, First is reducer function and second is initial data.
initail data will be the current value of the state.
const[state, dispatch] = useReducer(reducer, initialData);
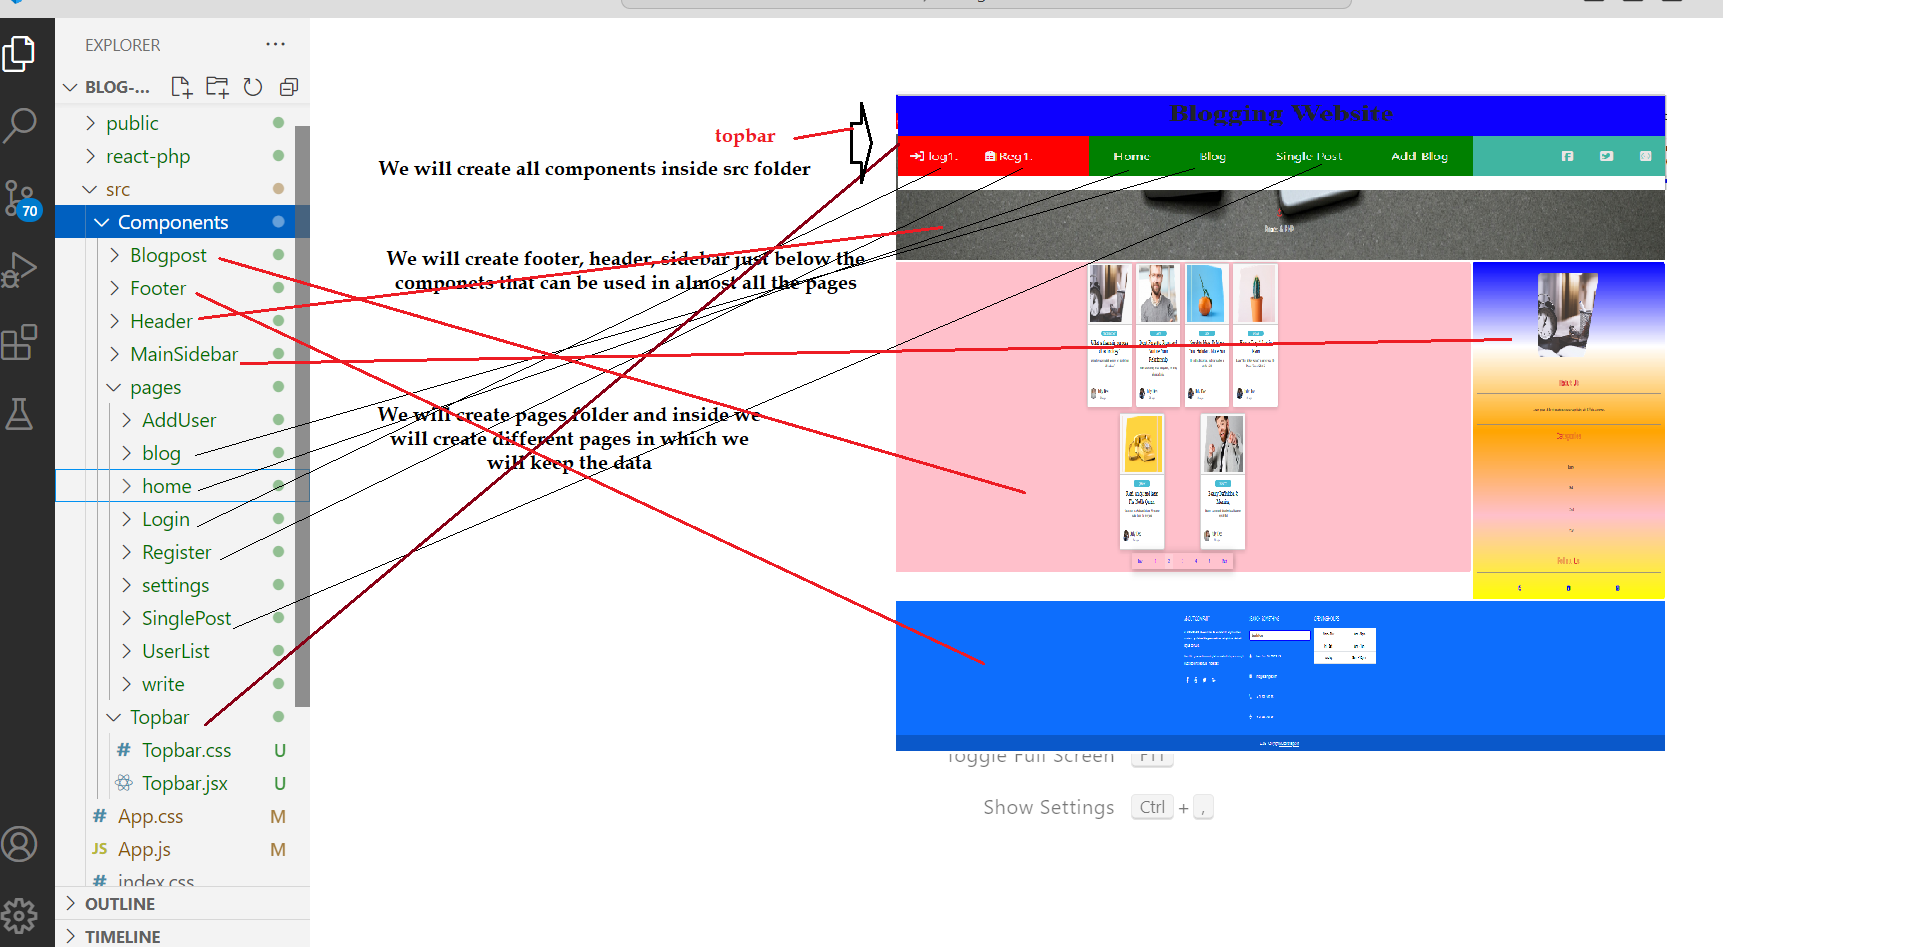
If we have to show the header and footer in all the pages, go to App.js and do as shown below:-
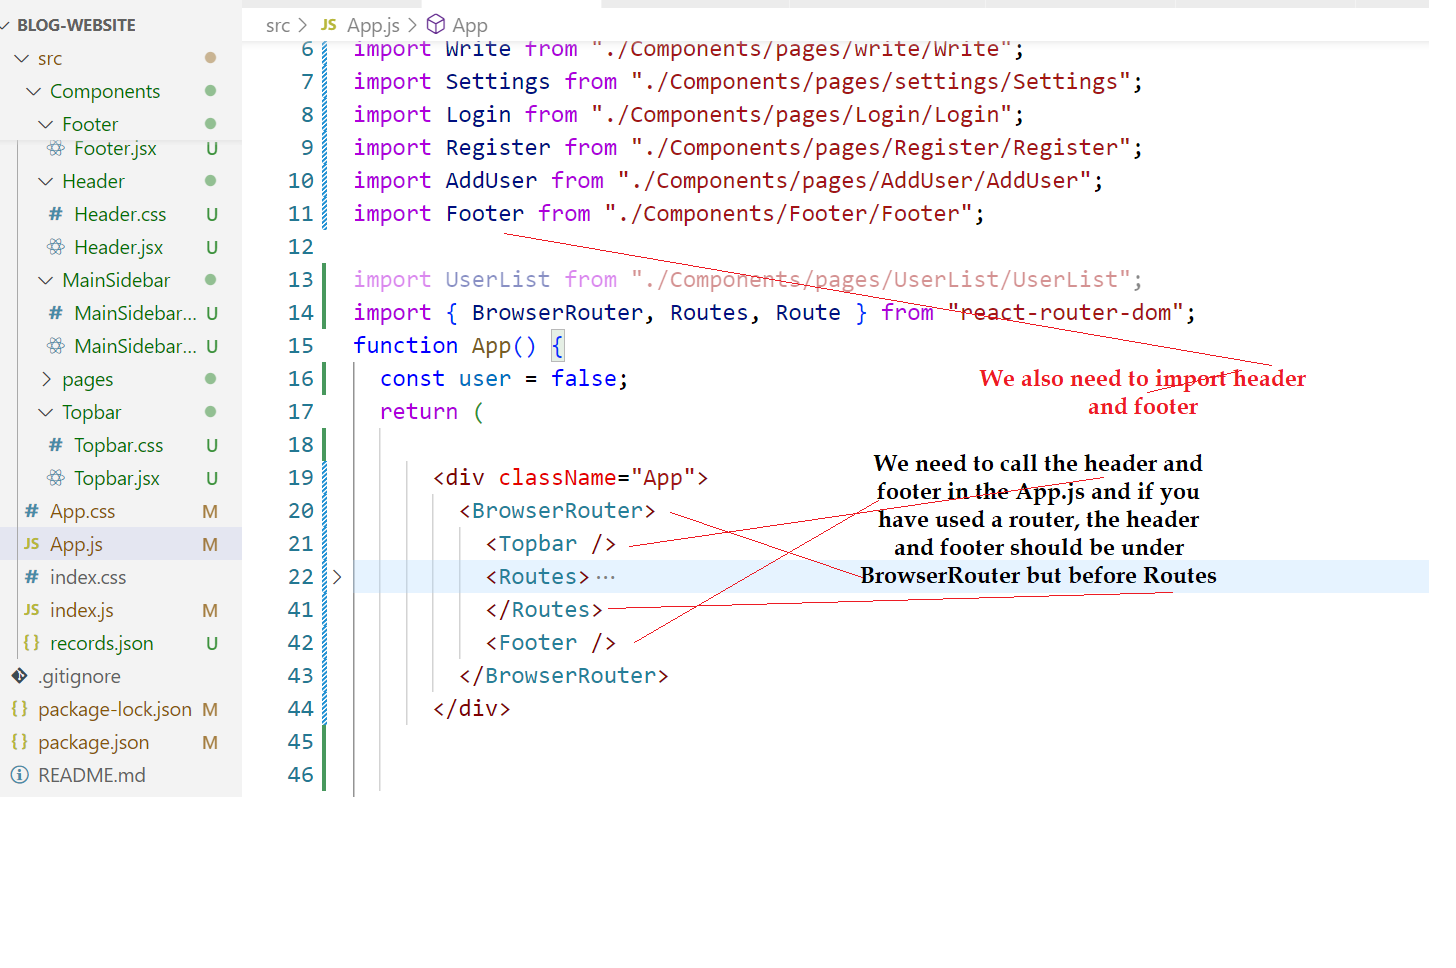
If we want to show any component on any particular page, we will not call? that component in App.js as it will show all the pages. We will import the component on the page we want to display only
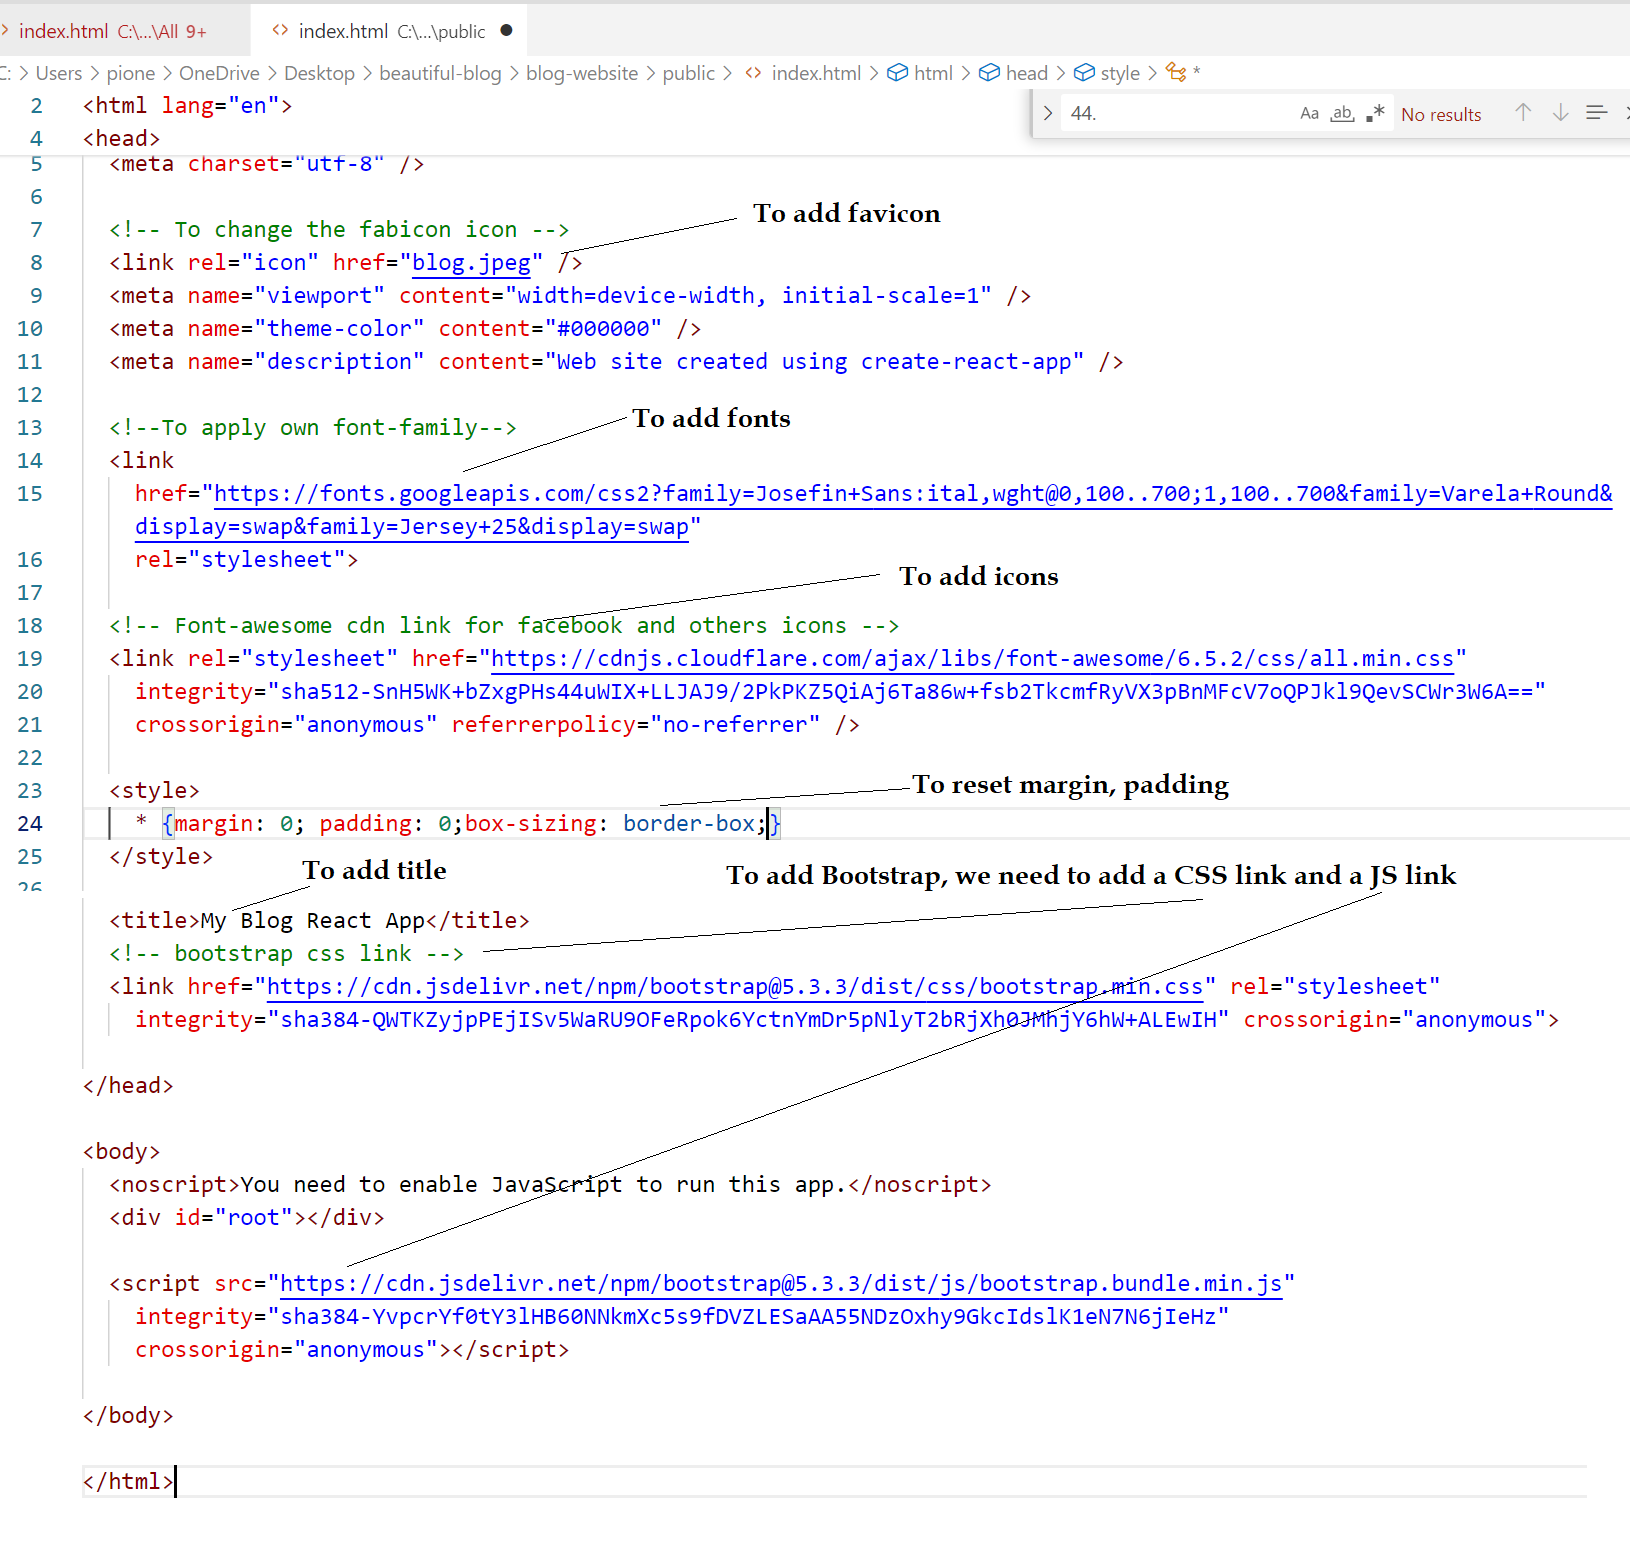
We need to go to the index.html under public folder to add title, bootstrap, fonts, social icons and reset
- We need to go to the index.html under public folder to add title, bootstrap, fonts, social icons and reset
- Step 1: Visit https://fonts.google.com/
- Step 2: Search the fonts you want such as Jose, Varela (YOu can add more than one font) and then copy the last link under link such and then paste it after meta under index.html under the public folder (path public>index.html)
- We need to keep all the images under Public folder in react to use the images.
- We can either make a folder inside the public folder like images and keep all the images or we can directly keep the images in public folder to use them as show blow


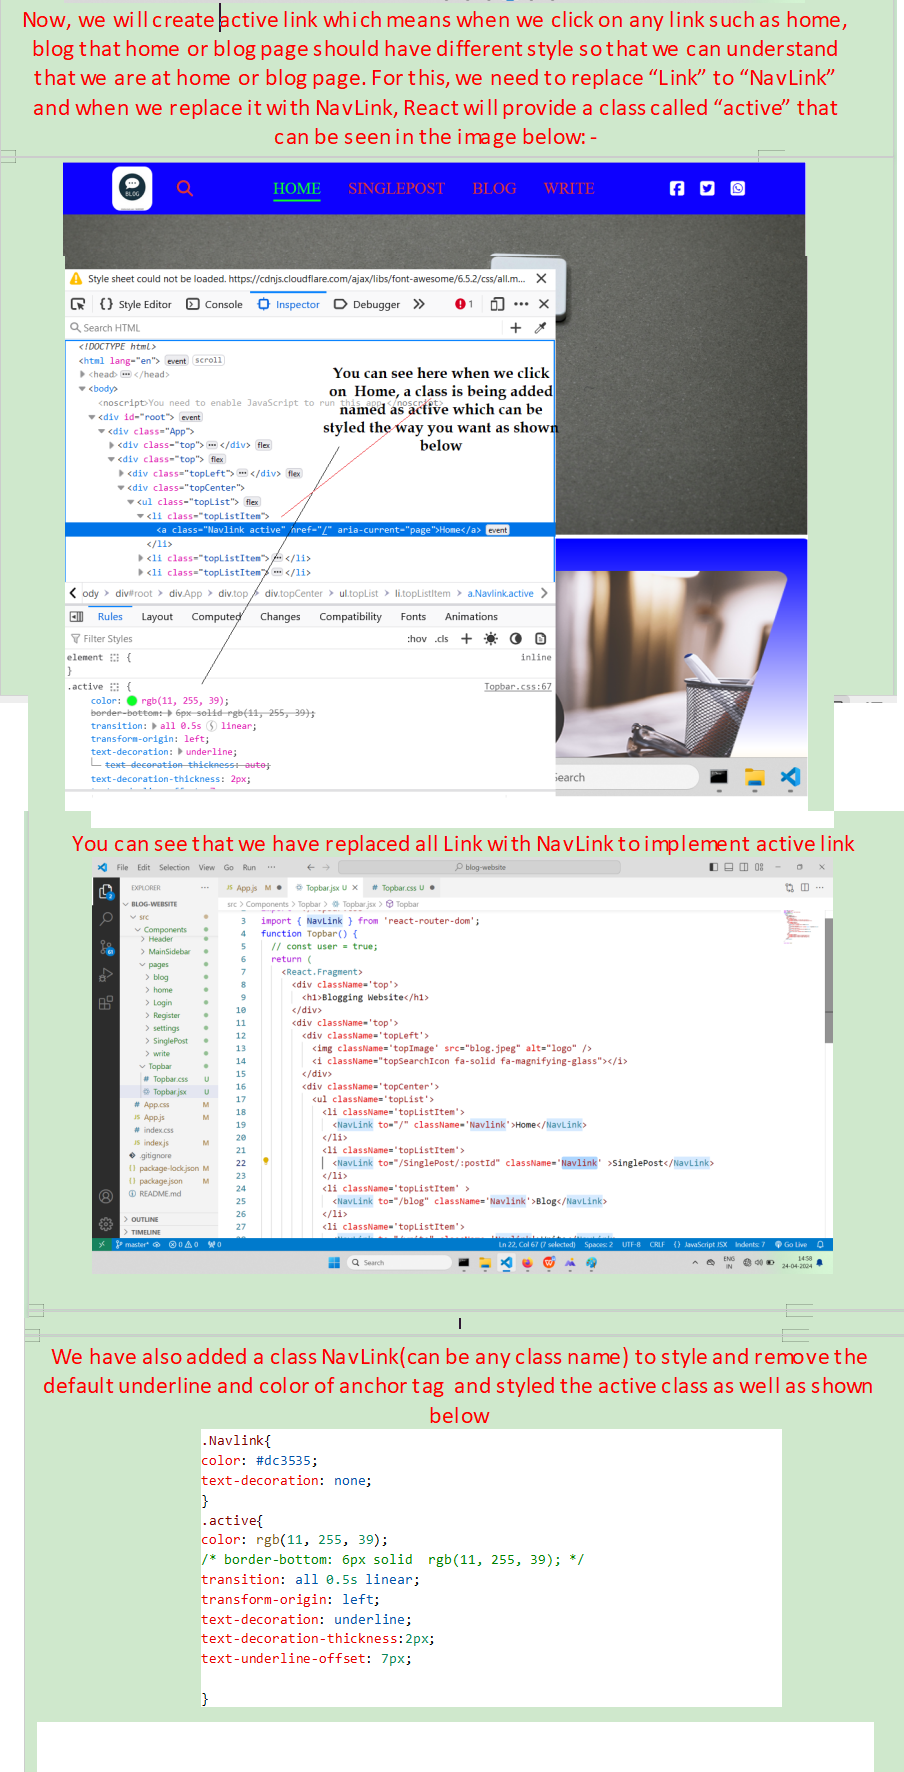
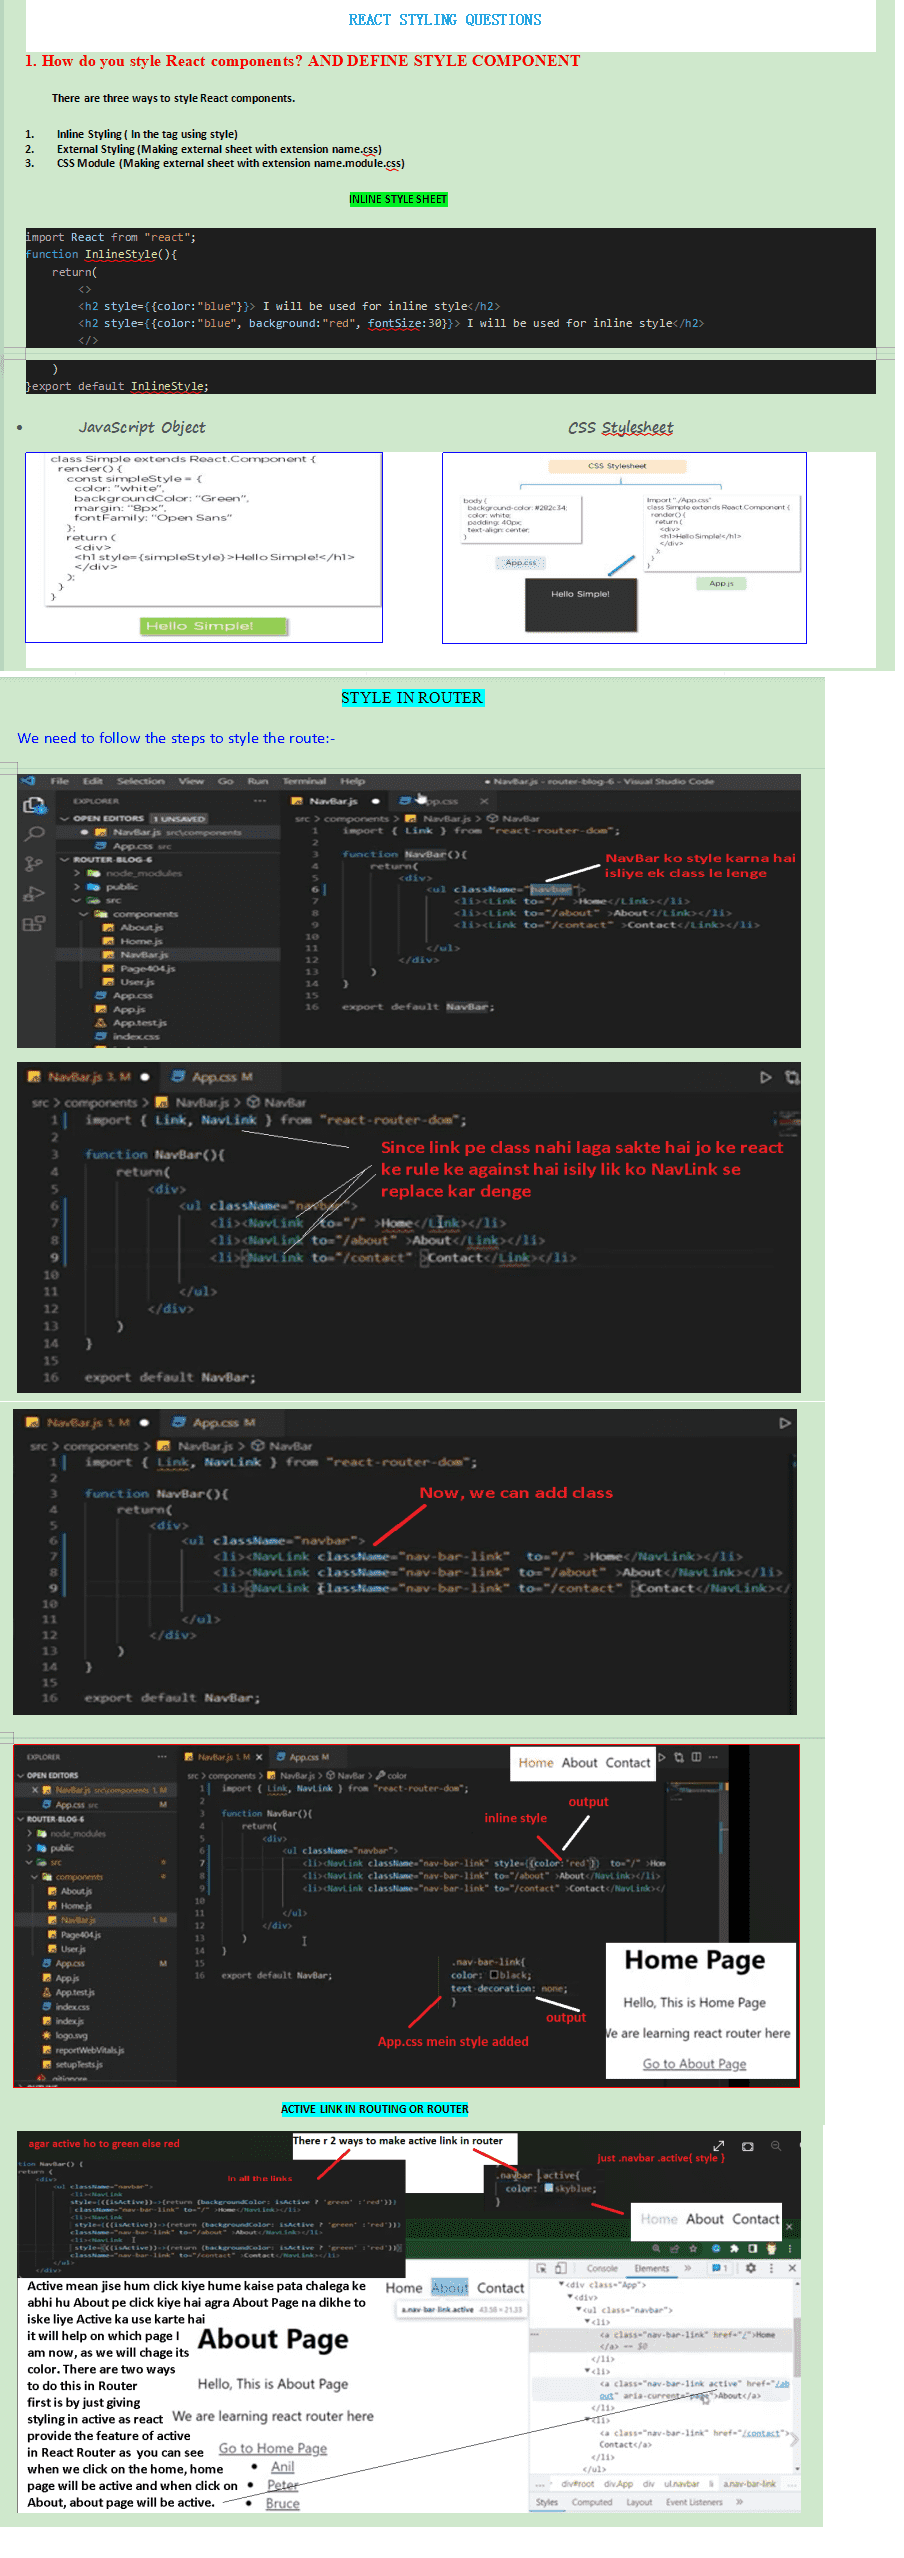
Link is used to create link to visit different page. It is just link anchor tag in css but when we use anchor tag in react, it will refresh the page but in react we don't want to refresh the page and this is the reason we use link in react, a tag will be replaced with link and href attribute will replaced by to.
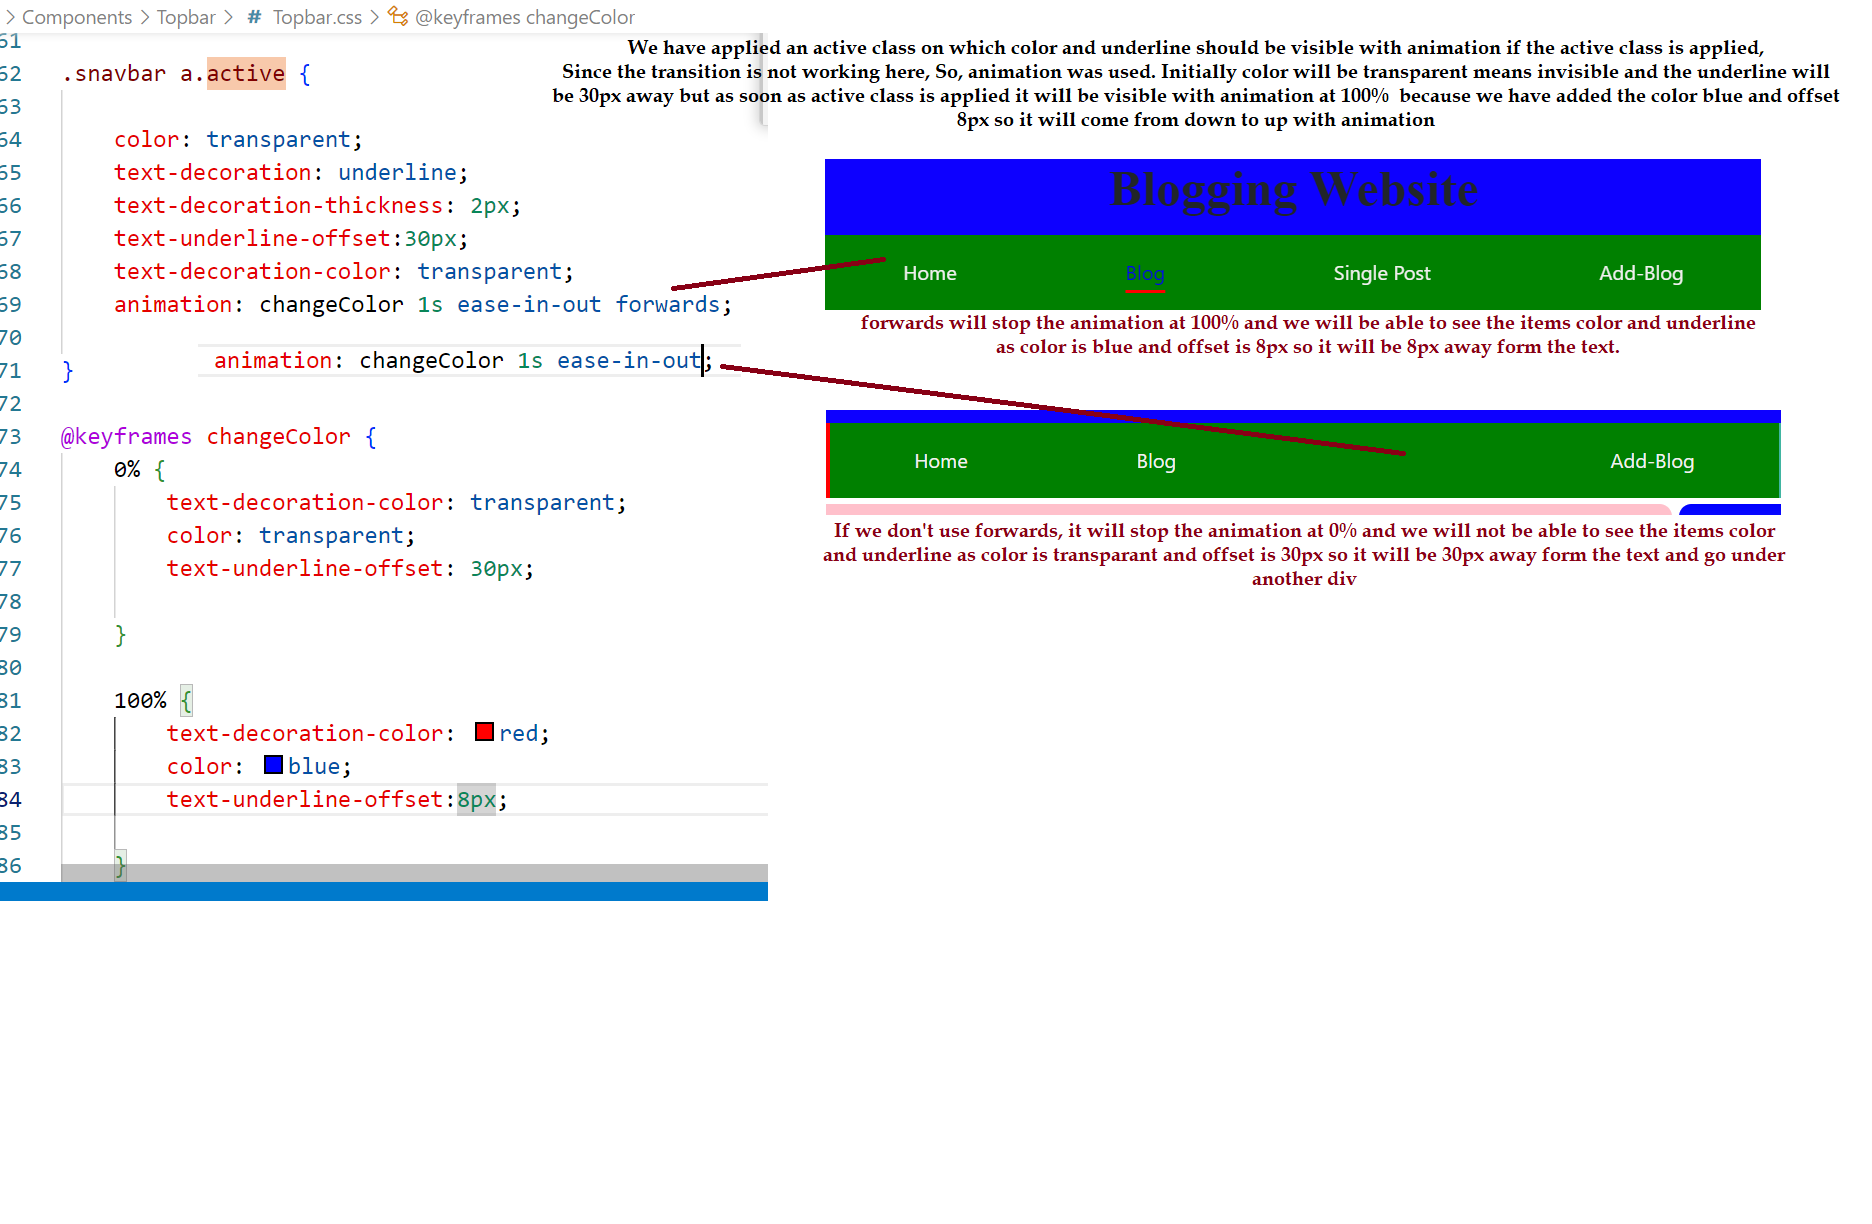
Navlink is used to create active link in react and it is created in navbar/topbar(name can be anything) page as shown below:-


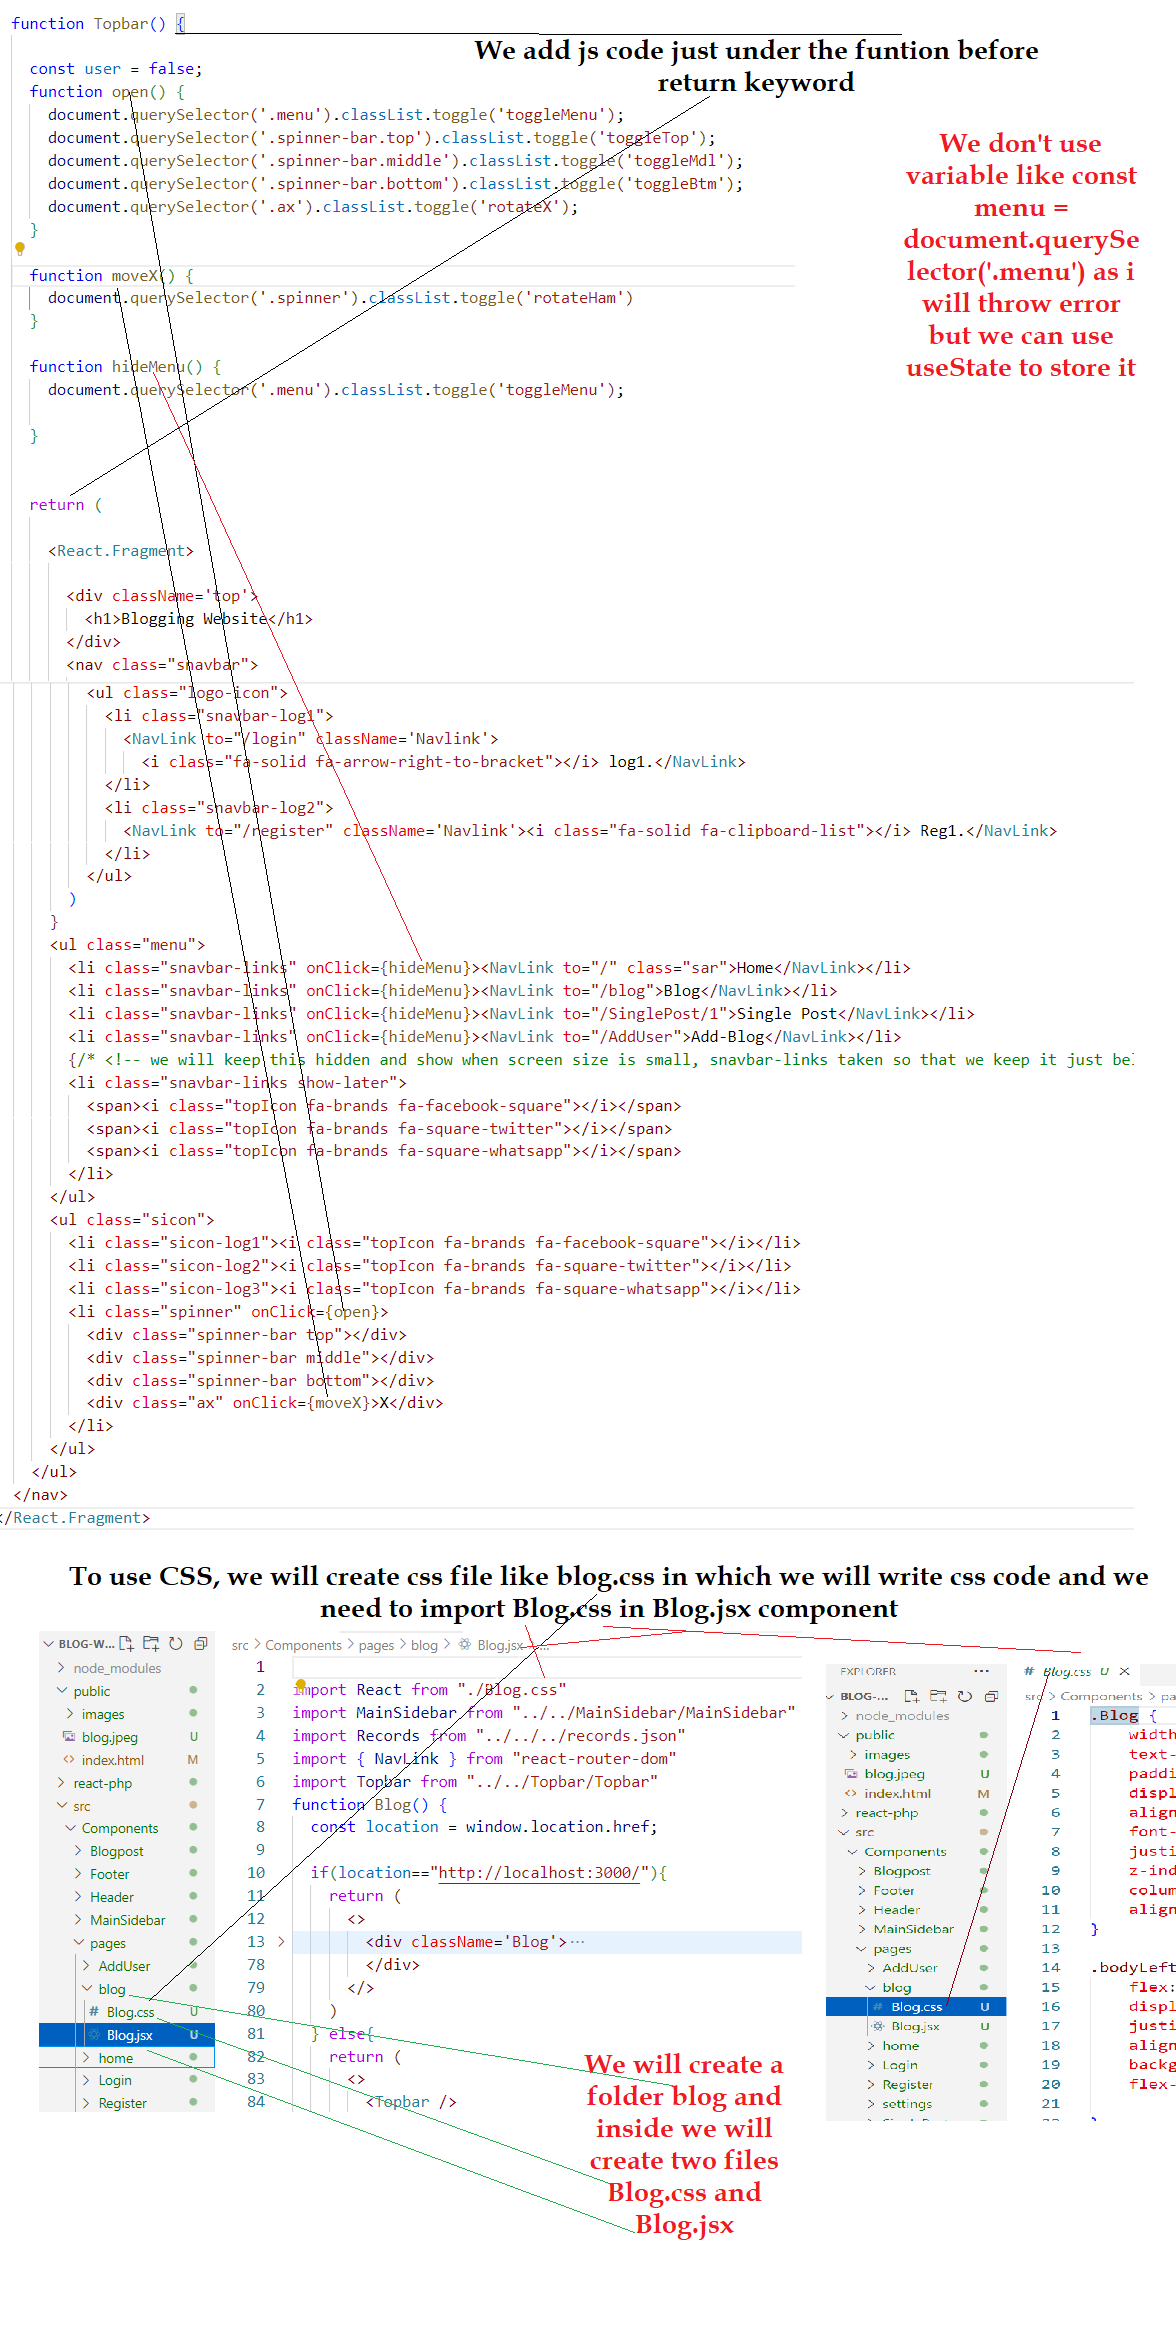
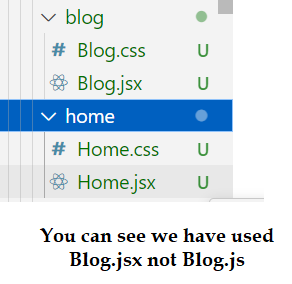
We use jsx instead if js like home.jsx. blog.jsx, etc because it will help to enable emmet abbreviation(It actually provides options when you use any html tag such as if you write p it will give the option to choose p and closing tag will be written automatically if we use jsx. If we still want to use home.js then we need to make some changes from settings so that VS code can enable emmet abbreviation as shown in the given videos.
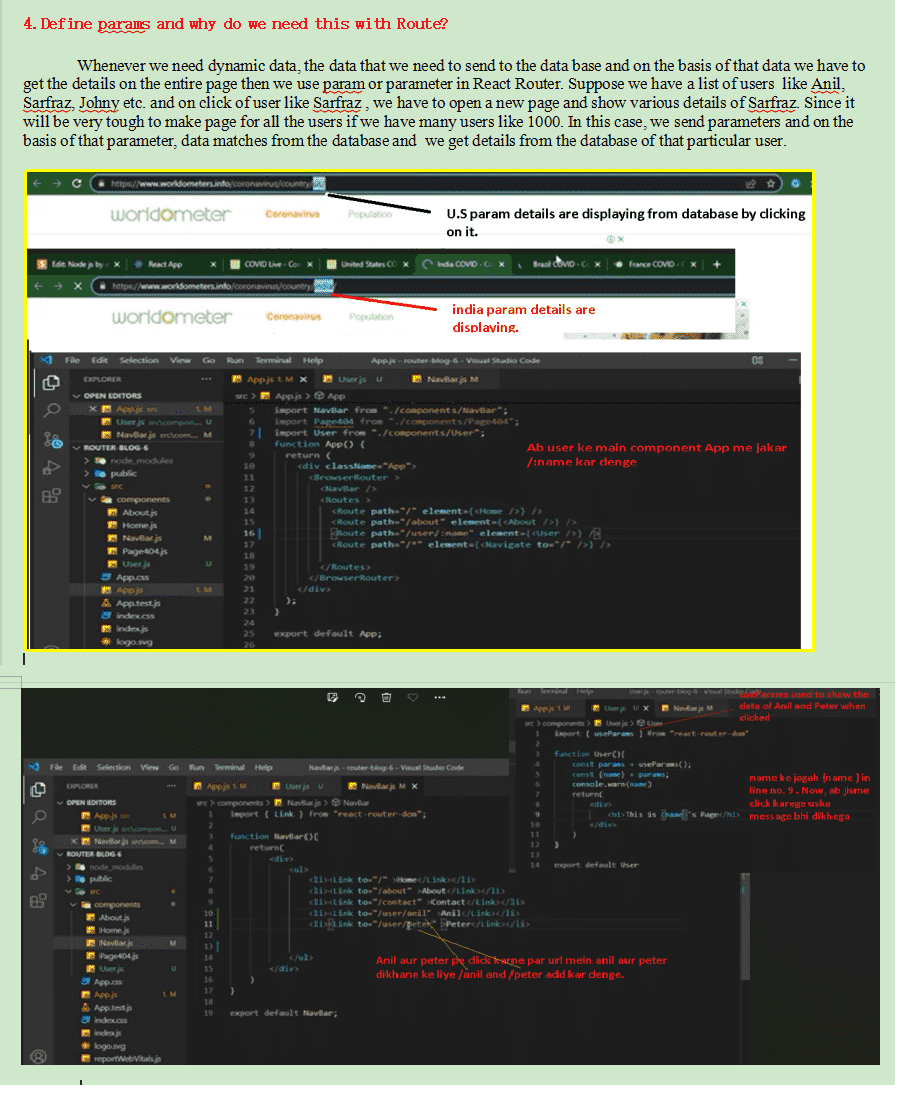
To display data by id we need to use useParam hook on the component we will show on the route.

AXIOS is a sepearte library created in react.js that works with API. For example- Google map, we mostly use google map in our website. We use google map to access the location of any place and for that google map provide us API and this google map API is not available in our application or project or website. So, we need to get/fetch the data of google map API and use it in our website so that we can access different places location and for this we use AXIOS.
AXIOS is better than fetch. AXIOS is promise based that gives the ability to take the advantage of JavaScript async and await for more readable asynchronous code. Axios is better than fetch because we do not require to convert the data into json as it is already converted by default. When we use fetch we need to conver the data into json formate everytime.
Axios built functions has the same name to do different actions such as get, post, delete, put. So, here in Axios we will use the same methods name. To get the request we will use .get() method in axios.
Write less in axios than fetch. We use only one then() call back function in axios.
It is better for error handling.


Equal height, different number of cards in different screen
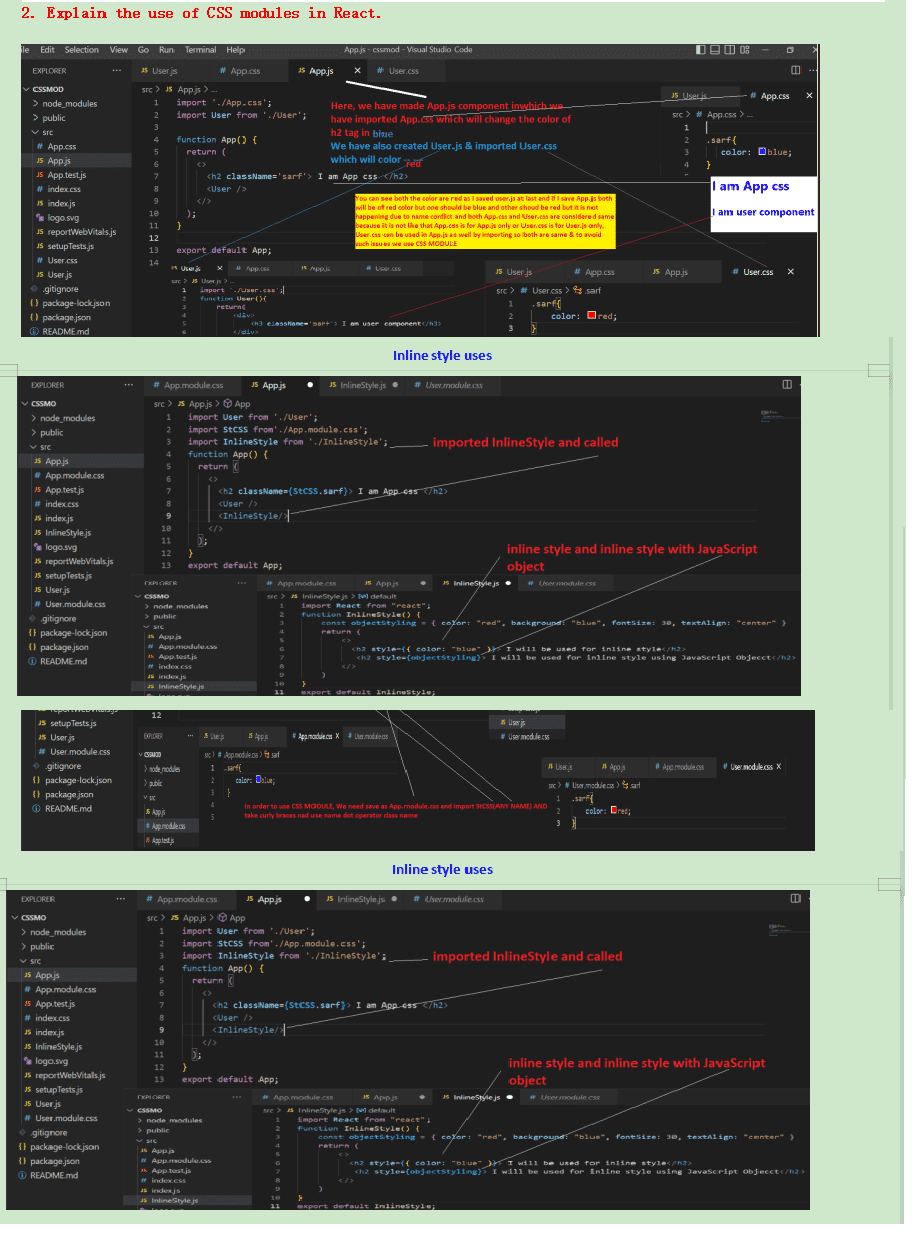
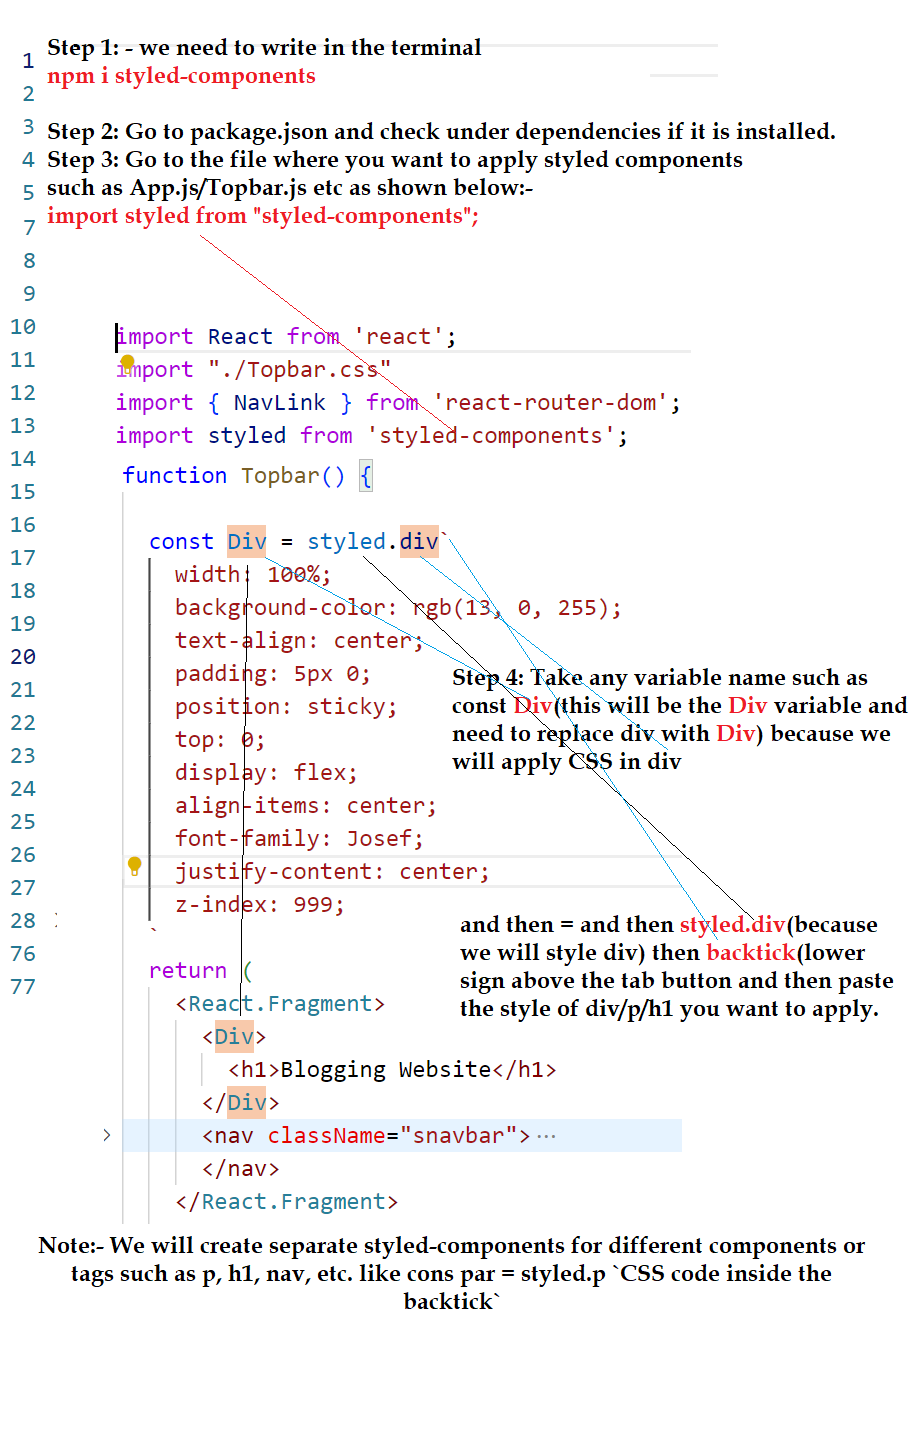
Use of style components in React.js
Styled Components is a popular library for styling React components. It allows developers to write CSS in JavaScript ,creating components with different styles within the component. Benefits : No worries about unique class names, Server-side rendering compatibility.
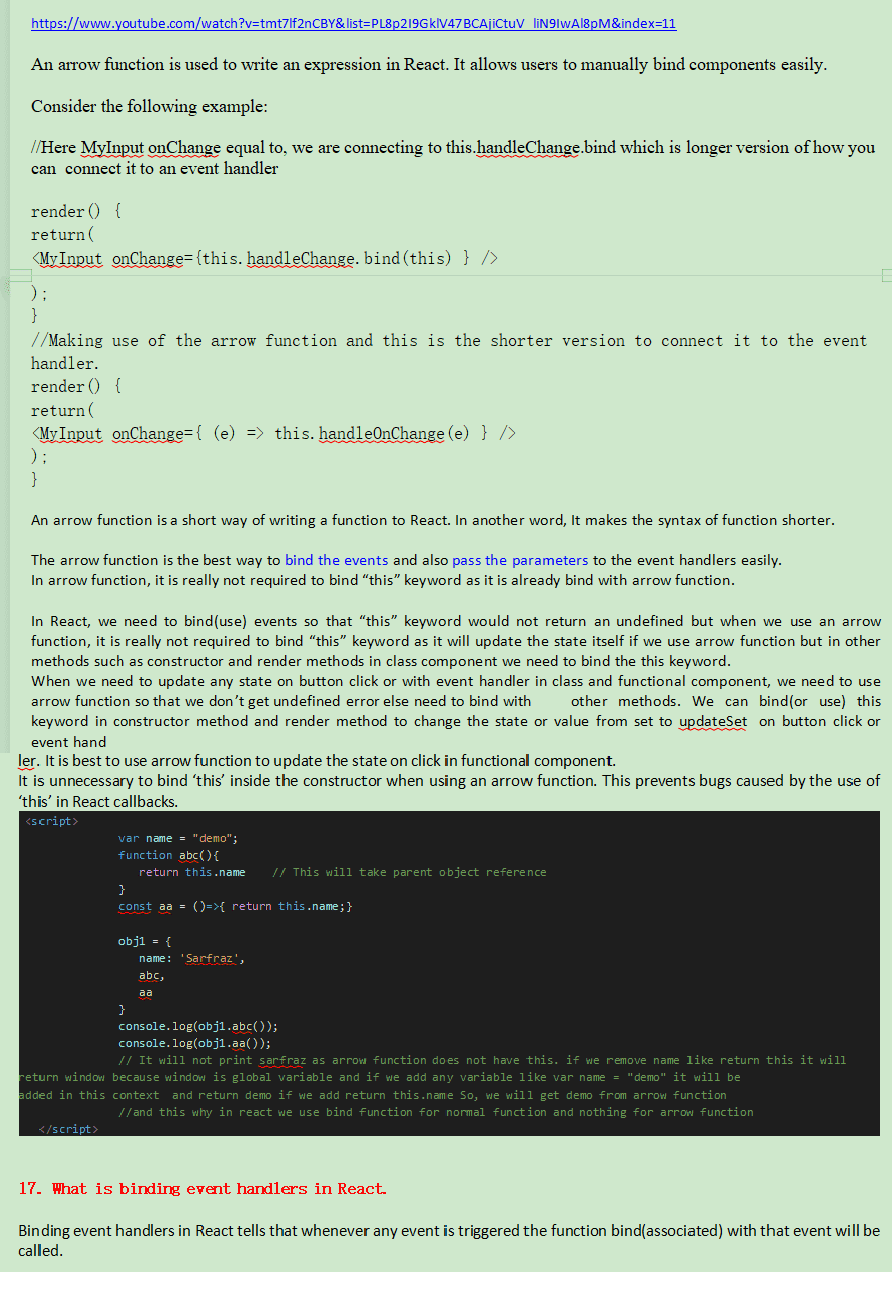
There are two types of comments in JavaScript.
1.Single Line Comment: It is represented by // (double forward slash)
2.Multi-Line Comment: Slash represents it with asterisk symbol as /* write comment here
Window in JavaScript is a global object that holds the structure like variables, functions, location, historyetc.
Statically typed language is a language in which we have to define variable type or data type before initialization like var, let, or const when we assign any value like a =10;
In statically typed language if we write like a=10; the interpreter/compiler/translator will throw an error as they compiler is not so advanced but in dynamically typed language the interpreter will add the variable type if we miss as it is very advanced.
Since, the interpreter of JavaScript add the variable type before the code execution so we don’t get any error but programming languages like c, c++, java are statically typed language.

Example:
function Person(name,age,gender)
{
this.name = name;
this.age = age;
this.gender = gender;
}
var person1 = new Person("Vivek", 76, "male");
console.log(person1);
var person2 = new Person("Courtney", 34, "female");
console.log(person2);
Second Method
How to fetch data, header or footer
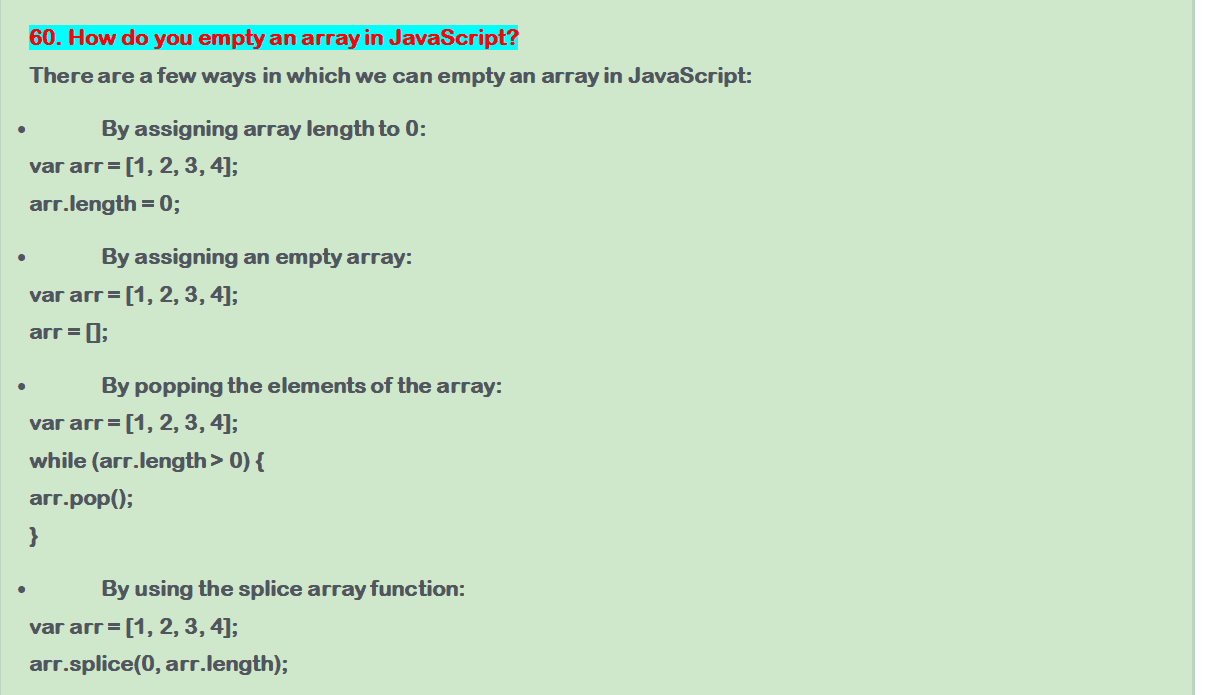
1st way by assigning empty array
2nd way by assigning array.length to zero
3rd way by usig popping method
3rd way by usig popping method

Here is the output :
Hello
Here is the output : Hello will be red in color
1st Method Using for loop
2nd Method Using double for loop
3rd Method Using Array Method